Sunday, April 3, 2011

Cloud Storages for Linux

Today the trend is to put your valuable data somewhere on the Internet and access it anywhere. This is a dramatic departure from the past as our trust grows towards Internet companies. More companies are offering cloud storage services, for example, Box.net and Zumodrive. Here I show how to set up Linux to access cloud storages.


Box.net offers 5GB of free online storage for personal use, but each upload must be smaller than 25MB. Zumodrive offers 2GB free space initially, but unlike box.net you can upload any size of files using the ZumoDrive desktop application.


Adding a Box.net folder in KDE Dolphin


  1. Select Network from the Places panel. Then, double-click on Add Network Folder.


  2. Choose the WebFolder (webdav) and click Next.


  3. Enter information for Box.net as follows.


Setting up Zumodrive on Mint KDE edition


  1. Download the Zumodrive package for Ubuntu 8 or later (zumodrive-ubuntu8-i386-0.989.deb).
  2. The Zumodrive package depends on openjdk-6-jre, but Sun's JRE is installed in Mint, so you don't have to install openjdk-6-jre.

    However, you need install libinotifytools0, libgnet2.0-0 and libnautilus-extention1. I used Synaptics to install the missing packages.
  3. Unpack the zumodrive package into the system.

    cd /
    dpkg --extract zumodrive-ubuntu8-i386-0.989.deb .

  4. Copy /usr/share/applications/zumodrive.desktop to your Desktop folder, so you can start Zumodrive by double-clicking the icon on desktop. Optionally, right-click on the icon, choose Properties and make it executable.


  5. Now double-click on the Zumodrive icon. Once you type in your email and password, you can access Zumodrive through the ~/Zumodrive folder.

Wednesday, March 23, 2011

Hacker's Guide To Installing Windows 7

Many people want to try the new Windows 7, but they're not too sure if Windows 7 is worth it. After all, it doesn't make sense to buy a new computer to try Windows 7 and then find out it's another lame bloatware. This guide will help an average joe to download, install and activate Windows 7 with freely available tools.


Hardware Requirements of Windows 7


First, you need to decide if your computer is capable of running Windows 7. According to Microsoft, Windows 7 has the following hardware requirements:


  • 1 GHz or faster 32-bit or 64-bit processor
  • 1 GB RAM (32-bit) or 2 GB RAM (64-bit)
  • 16 GB available hard disk space (32-bit) or 20 GB (64-bit)
  • DVD-ROM drive or DVD burner
  • DirectX 9 graphics card with WDDM 1.0 or better driver


That means Windows 7 can run on most computers available. You may have to buy additional memory or a new video card to be able to run Windows 7. See the Windows 7 Compatibility site.


Next, decide which edition of Windows 7 you want to install on your computer. There are many editions of Windows 7, for example, Home Premium, Professional, Enterprise and Ultimate. For most people, Windows 7 Home Premium is good enough.


Windows 7 Direct Downloads and Bittorrents


It is recommended that you use aria2, Halogenware Retriever or Free Download Manager to download Windows 7 so you can resume a download in the event of connection problems. On the Web, you can download DVD images of Windows 7 from the following locations:


  • Windows 7 Home Premium SP1 (x86 English) X17-24208.iso

    MD5: c5bb99b2f1a9e7a5b4fbc6e3eff70882

    SHA1: 22df3e5a80f8dbf014c2776a01b1cd9f24d83233

    CRC32: 9c5dc931
  • Windows 7 Home Premium SP1 (x64 English) X17-24209.iso

    MD5: 971843a457b6e0db0af61258cbe7256a

    SHA1: b4821f46a171708f5f8f8a0ef48fc16529437961

    CRC32: d236fd70
  • Windows 7 Professional SP1 (x86 English) X17-24280.iso

    MD5: befd4f1e00ec8da2effbd789f4e66fbf

    SHA1: 917a542b0541054bb9c2a06a11a46aed6943856b

    CRC32: 20078d8d
  • Windows 7 Professional SP1 (x64 English) X17-24281.iso

    MD5: 338f3245d68527db47b8a44e55317d0a

    SHA1: 5ed2584110e03f498db4458ba9fafd5a7ef602ed

    CRC32: 74f3cb73
  • Windows 7 Ultimate SP1 (x86 English) X17-24394.iso

    CRC32: C2966895

    MD5: 24F3A45D43D7C532AA3126CC094C61BD

    SHA1 : 92c1ada4ff09c76ec2f1974940624cab7f822f62

    SHA2: BBB5E0BAF3659F6DEC96B50381CBB05C09F066675EE639324B728215D5D47C43
  • Windows 7 Ultimate SP1 (x64 English) X17-24395.iso

    CRC32: 8589EE18

    MD5: 56A26636EC667799F5A7F42F142C772D

    SHA1: 1693b6cb50b90d96fc3c04e4329604feba88cd51

    SHA2: 9A2F3972FBBBB4974255CCCC26CDA9B1A75D9D0179867D6111162AC33F0CB693
  • Windows 7 Home Premium (x86 English) X15-65732.iso

    SHA1: CC9D8220B2179E784D85BF1EA98D2EE2190D534F

    ISO/CRC: 5DF6DBA0
  • Windows 7 Home Premium (x64 English) X15-65733.iso

    SHA1: 336779EA6B65F63E11A609B4D021439C47AB315B

    ISO/CRC: 56D954E4
  • Windows 7 Professional (x86 English) X15-65804.iso

    SHA1: 697FA06554502FB21D30275273B25747299C020D

    ISO/CRC: 578725D1
  • Windows 7 Professional (x64 English) X15-65805.iso

    SHA1: 50127304441A793EE51B3F501289F6599A559E9F

    ISO/CRC: 502C42C1
  • Windows-7-SP1-EN-MSDN-TechNet.torrent


I like using aria2 for download. Get my aria2 win32 build from here. To use aria2c to download Windows 7 Home Premium, open the Command Prompt and type the following command.


aria2c --file-allocation=prealloc http://msft-dnl.digitalrivercontent.net/msvista/pub/X15-65732/X15-65732.iso


To stop the download, press Ctrl+C twice. Later, you can resume download with the command:


aria2c -c http://msft-dnl.digitalrivercontent.net/msvista/pub/X15-65732/X15-65732.iso


After the download has finished, verify the checksums of the download with md5deep or HashCheck shell extension.

This is optional. If you want to create a single All-in-One DVD that can be used to install Home Basic, Home Premium, Professional and Ultimate edition, download and run eicfg_remover. This tool removes ei.cfg from the ISO file.

Then, burn the image to a blank DVD. You need to have a DVD burner and a blank DVD, of course. For free DVD-burning software, you can get ImgBurn, InfraRecorder or CDBurnerXP.


Wednesday, March 2, 2011

Compiling Linux Kernel 2.6.38

Let's compile a Linux kernel. To build a kernel, I installed the following packages:


  • binutils
  • gcc-4.4
  • libglade2-dev for "make gconfig"
  • libqt3-mt-dev or libqt4-dev for "make xconfig"
  • make
  • module-init-tools
  • patch


libglade2-dev is needed to configure the kernel by running “make gconfig”. In addition, I am going to include the following features.


  • unionfs is a union filesystem that allows me to merge several filesystems into a single logical one. It has several uses, such as Live CD's and modifiable read-only filesystem.
  • ndiswrapper allows me to use many network devices by installing native Windows drivers.

I downloaded the kernel source and unpacked it.


tar xjvf linux-2.6.38.tar.bz2
cd linux-2.6.38

Then, I applied the unionfs patch.


gzip -dc ../unionfs-2.5.3_for_2.6.18.8.diff.gz | patch -p1 -l

Then, I configured the kernel with a GTK configuration tool.


cp /boot/config-2.6.31.5 .config
make gconfig


Open Makefile with an editor and define EXTRAVERSION if necessary.


Now let's compile the kernel.


make bzImage
make install
make modules
make modules_install
depmod -e -F /boot/System.map-2.6.38 -m 2.6.38


Set the default root device and ramdisk size for the new kernel.


cd /boot
rdev vmlinuz-2.6.38 1,0
ramsize vmlinuz-2.6.38 4096


Finally, compile ndiswrapper (Patches available here).


tar xzf ndiswrapper-1.55.tar.gz
cd ndiswrapper-1.55
KVERS=2.6.31.6 make uninstall
KVERS=2.6.31.6 make
KVERS=2.6.31.6 make install


Generate modules.* files.


depmod -e -m -F /boot/System.map-2.6.31.6 2.6.31.6

Sunday, January 2, 2011

Building mplayer on Debian Linux

MPlayer is one of my favorite media players. It is used with such frontend as smplayer, gnome-mplayer or MPlayerGUI to provide a good alternative to Windows Media Player and VLC. First, I installed the necessary compiler toolchain.


  • autoconf
  • automake
  • binutils
  • bison
  • cpp
  • g77 or fort77
  • gcc
  • gettext
  • g++
  • libtool
  • make


Next, I installed the necessary development libraries:


  • libasound2-dev
  • libbz2-dev
  • libesd0-dev
  • libfontconfig1-dev
  • libfribidi-dev
  • libjpeg62-dev
  • libncurses5-dev
  • libpng12-dev
  • libxv-dev


Some useful libraries are not included in the Debian distribution, so I had to compile them on my own. They are faac, lame, libdca, live, x264 and xvidcore. First, I built liblzo.


tar xzvf /usr/src/lzo-2.04.tar.gz
cd lzo-2.04/
./configure --prefix /usr
make
make install


Then, I built the giflib.


tar xjvf /usr/src/giflib-4.1.6.tar.bz2
cd giflib-4.1.6/
ls
./configure --build=i586-pc-linux-gnu --prefix=/usr --disable-shared
make
make install


I built cdparanoia.


tar xzvf /usr/src/cdparanoia-III-10.2.src.tgz
cd cdparanoia-III-10.2/
./configure --build=i586-pc-linux-gnu --prefix=/usr --disable-shared
make
make install


I compiled libdca in the following way:


tar xjvf libdca-0.0.5.tar.bz2
cd libdca-0.0.5/
./configure --build=i586-pc-linux-gnu --prefix=/usr --disable-shared
make
make install


I built ogg, vorbis, theora and speex.


./configure --build=i586-pc-linux-gnu --prefix=/usr --disable-shared
make
make install


To compile lame, run:


tar xzvf /usr/src/lame-3.98.4.tar.gz

cd lame-3.98.4/

./configure --build=i586-pc-linux-gnu --prefix=/usr --disable-shared --mandir=/usr/share/man --enable-expopt=full --enable-nasm

make

make install


Unpack live555 source in /usr/lib and compile live555 as follows:


cd /usr/lib/live

./genMakefiles linux

make


To compile x264, do:


tar xjvf /usr/src/x264-snapshot-20110102-2245.tar.bz2

cd x264-snapshot-20110102-2245/

sh configure --host=i586-pc-linux-gnu --prefix=/usr --enable-pic --disable-asm

make

make install


Compile the xvid library as follows:


cd xvidcore/build/generic

./configure --build=i586-pc-linux-gnu --prefix=/usr

make

make install


Finally, you're ready to compile MPlayer. Get the latest snapshot tarball and extract it:


wget ftp://ftp.mplayerhq.hu/MPlayer/releases/mplayer-export-snapshot.tar.bz2

tar xjvf mplayer-export-snapshot.tar.bz2

cd mplayer-export-2009-05-29

CPPFLAGS='-DLIBTWOLAME_STATIC' ./configure --prefix=/usr --enable-runtime-cpudetection --yasm=/usr/bin/yasm --language=all --confdir=/etc/mplayer

make

make install

chmod 4755 /usr/bin/mplayer

Wednesday, December 29, 2010

ssh + netcat + tar + xz = Secure Network Transfer Link

I found a way to use simple command-line tools to transfer files between computers far apart. Using this method, I was able to duplicate the contents of an entire filesystem securely over a SSH tunnel between two computers. In this method, no NFS server or scp command is needed. However, netcat plays an important role in this method. Let's first make sure we have everything ready.


  • OpenSSH
  • netcat
  • tar or cpio
  • xz, lzma, lzo, bzip2 or gzip


I'll be really brief.


  1. At the computer where you will receive files (say, 192.168.1.2), type the following commands to start netcat in listening mode and use tar + xz to unpack the incoming stream of data.


    cd /my/downdoad/folder
    nc -l 7749 | xz -dc | tar xvf -


  2. At the computer where you will send files (say, 192.168.1.1), create a ssh tunnel to the computer receiving files (192.168.1.2).


    ssh -l username -L 5525:192.168.1.2:7749 192.168.1.2


  3. Open another terminal window and type the following command to start sending files.


    tar cvf - . | xz -c | nc 127.0.0.1 5525


Partition Imaging with Netcat


Backing up hard drive partitions over the network can be accomplished with just a few simple tools like netcat. This is another handy usage of netcat. At the receiving computer where you'll store the backup, type the command to receive the partition image:


nc -l 7749 | lzma -dc | dd of=/dev/sda8 bs=640K


At the sending computer from which you'll transmit the partition, establish an SSH link first:


ssh -l username -L 5525:192.168.1.2:7749 192.168.1.2


Then compress the partition data and transmit over the secure SSH channel:


dd if=/dev/sda11 bs=640K | lzma -9c | nc 127.0.0.1 5525


Note that the transfer may take many hours for a large partition.

Sunday, November 14, 2010

Transmission-Daemon for Windows

Here are my Windows builds of transmission-daemon. I built it with Cygwin's GCC compiler. 7-zip or a newest version of unzip should be used to unpack them.


The package contains the following files:


  • Cygwin1.dll

    Cygwin Unix layer

  • transmission-cli.exe

    Command-line Bittorrent Client

  • transmission-create.exe

    Create .torrent files

  • transmission-daemon.exe

    Transmission server

  • transmission-edit.exe

    Edit .torrent files

  • transmission-remote.exe

    Control the transmission daemon

  • transmission-show.exe

    Show .torrent contents


Unpack the package into a folder, for example, C:\Program Files\Transmission. Then, create a shortcut with the following command:

transmission-daemon -b -o -m -ep -a 127.0.0.1,192.168.*.* --utp


Double-clicking the shortcut will not open any window. However, transmission-daemon is silently running in the background. You can control the daemon with any Web browser by opening this local Web address:


http://127.0.0.1:9091/

Although you can control transmission-daemon with a Web browser, it's not a pretty thing to do so. I recommend using transmission-remote-dotnet or transmission-remote-gui. The following is a screenshot for Transmission Remote .NET which is written in C#.


And, below you can see Transmission Remote GUI that's written in Pascal.


The settings for the daemon are stored in the ~/.config/transmission-daemon folder. Make sure the HOME environment variable points correctly to your folder.


Also, TRANSMISSION_WEB_HOME environment variable should be correctly set up to use the web browser interface.


To learn how to build transmission-daemon for Windows, read this post.

Saturday, August 21, 2010

Debian Linux: Simple steps to recover files from /lost+found

The following steps illustrate how one can use simple shell commands to recover files from the /lost+found directory in Linux. This assumes that you actually have some files in /lost+found.


  1. First, concatenate all the *.md5sums files in /var/lib/dpkg/info into a single file:


    cd /var/lib/dpkg/info
    cat *.md5sums | sort -k 2 > /tmp/all.md5


  2. Go to the /lost+found directory. fsck may have placed some files here after fixing the Linux partition. If you don't find any file here, you can relax and skip the following steps. Run md5sum on files in /lost+found.


    cd /lost+found
    md5sum * | sort > /tmp/lost.md5


  3. Put only the md5sum values into a temporary file, called 0.txt.


    awk '{print $1}' /tmp/lost.md5 > /tmp/0.txt


  4. Search all.md5 for the md5sum values in 0.txt and save the results in 1.txt.


    for f in $(cat /tmp/0.txt); do grep $f all.md5 >> /tmp/1.txt; done


  5. Put the names of files in /lost+found into a temporary fie 2.txt.


    awk '{print $2}' /tmp/lost.md5 > /tmp/2.txt


  6. Move the lost+found files to their original locations.


    cd /
    for $f in $(cat /tmp/2.txt); do MD5=$(grep $f /dev/shm/lost.md5 | awk '{print $1}'); ORIGIN=$(grep $MD5 /tmp/1.txt | awk '{print $2}'); mv /lost+found/$f /$ORIGIN; done

Monday, August 9, 2010

Tweaking Lenovo IdeaPad S12

I bought Lenovo IdeaPad S12 for $400. This little laptop has 12.1" display, VIA Nano processor, 1GB memory and 160GB hard drive. It's shipped with Windows XP, but I want to install Windows 7 alongside XP, so as to have a dual-boot system.


Shrinking the Recovery Partition


I booted IdeaPad S12 with my own Linux Live CD. In Xterm, I typed the following command:


fdisk -l -u /dev/sda


I got the following output.


Disk /dev/sda: 160.0 GB, 160041885696 bytes
255 heads, 63 sectors/track, 19457 cylinders, total 312581808 sectors
Units = sectors of 1 * 512 = 512 bytes
Disk identifier: 0xee8a96be

Device Boot Start End Blocks Id System
/dev/sda1 * 2048 217909247 108953600 7 HPFS/NTFS
/dev/sda2 217909248 281638911 31864832 f W95 Ext'd (LBA)
/dev/sda3 281638912 312581807 15471448 12 Compaq diagnostics
/dev/sda5 217911296 281638911 31863808 7 HPFS/NTFS


The last primary partition /dev/sda3 seems to be Lenovo's recovery partition. I was able to boot the recovery partition with the following GRUB commands:


root (hd0,2)
chainloader +1
boot


Once I boot into Lenovo's OneKey Recovery System, I can use OneKey AntiVirus to scan the laptop for virus or use OneKey Recovery to restore the laptop to the factory state. I rebooted the laptop with my Linux Live CD. Then, I used GParted to shrink /dev/sda3 and changed its partition number to /dev/sda4:


  1. Shrink /dev/sda3 to 6 GB.
  2. Duplicate /dev/sda3 to a new primary partition /dev/sda4.
  3. Remove the partition /dev/sda3.
  4. Change the type of the new partition /dev/sda4 to 12.


After that, my partition layout looks like this:


Disk /dev/sda: 160.0 GB, 160041885696 bytes
255 heads, 63 sectors/track, 19457 cylinders, total 312581808 sectors
Units = sectors of 1 * 512 = 512 bytes
Disk identifier: 0xee8a96be

Device Boot Start End Blocks Id System
/dev/sda1 * 2048 217909247 108953600 7 HPFS/NTFS
/dev/sda2 217909248 281638911 31864832 f W95 Ext'd (LBA)
/dev/sda4 299997810 312576704 6289447+ 12 Compaq diagnostics
/dev/sda5 217911296 281638911 31863808 7 HPFS/NTFS


I restarted my laptop. I was able to boot Lenovo's OneKey Recovery System using the following GRUB commands.


root (hd0,3)
chainloader +1
boot


Moving Lenovo's pre-installed Windows XP to a logical partition


To reserve primary partitions for other crucial operating systems, I moved the Windows XP partition to the extended partition. This technique is explained in this post. Roughly speaking:


  1. Shrink the Windows XP partition (/dev/sda1) by half using GParted. Space is created between /dev/sda1 (Windows XP, type 7) and /dev/sda2 (extended, type f).
  2. Enlarge the extended partition (/dev/sda2) to the left. A space is created at the beginning of the extended partition.
  3. Make a copy of Windows XP partition in the space of the extended partition. The new partition will become /dev/sda6.
  4. Fix the partition numbers with fdisk (switching partition numbers of /dev/sda6 and /dev/sda5). Previously, /dev/sda6 came before /dev/sda5.
  5. Fix BOOT.INI of the new XP partition (/dev/sda5).
  6. Boot the new XP partition (/dev/sda5) in safe mode using GRUB or SYSLINUX. Change drive letters in the registry.
  7. Reboot Windows XP (/dev/sda5) normally and remove the old partition (/dev/sda1).


Starting Windows XP with SYSLINUX


Recently, I switched to SYSLINUX. I created a 100MB primary partition (/dev/sda1) formatted with FAT16. Then, in Linux, I installed SYSLINUX.


syslinux /dev/sda1

A new MBR had to be installed, too.


install-mbr /dev/sda -v --drive 0x80 --enable +14

I copied chain.c32 from the SYSLINUX package to the SYSLINUX partition (/dev/sda1). Then, I copied NTLDR, NTDETECT.COM and BOOT.INI to the SYSLINUX partition (/dev/sda1), too.


I created a text file named SYSLINUX.CFG with the following instruction.


TIMEOUT 30
DEFAULT chain.c32 ntldr=NTLDR

This will let you boot Windows XP in a logical partition.


Installing Programs on Windows XP


I removed the following programs from factory-installed Windows XP of Lenovo S12:


  • Symantec Norton Internet Security
  • Diskeeper
  • Veriface

Then, I installed the following software:


  • Avast Anti-virus
  • MyDefrag


Installing Windows 7 Home Premium


I created a new NTFS partition (/dev/sda2) using GParted. I set its bootable flag and hid all other FAT and NTFS partitions. Then, I installed Windows 7 Home Premium.


After that, I moved the Windows 7 partition into the extended partition as /dev/sda6. Then, I removed the original partition (/dev/sda2). I rebooted with Windows 7 installation DVD, clicked the Repair option and opened the Command Prompt. I typed the following commands to make the new Windows 7 partition bootable.


C:
bcdedit /store C:\Boot\BCD /enum
bcdedit /store C:\Boot\BCD /set {bootmgr} device partition=C:
bcdedit /store C:\Boot\BCD /set {default} device partition=C:
bcdedit /store C:\Boot\BCD /set {default} osdevice partition=C:

Then, I added the following entry to SYSLINUX.CFG.


LABEL win7
KERNEL chain.c32
APPEND hd0 6

To make sure that SYSLINUX can boot Windows 7, I typed the following command at the boot: prompt.


chain.c32 hd0 6

Now I am able to boot Windows 7 from a logical partition.


Booting Windows 7 with Software SLIC emulation


There are many ways to emulate SLIC so that Windows 7 can be activated. In my case, I've set up a boot sequence like this.


MBR -> SYSLINUX -> GRUB -> Windows 7

GRUB was patched for the loadslic command which is crucial for Windows activation. The SYSLINUX command to invoke GRUB is like this.


chain.c32 grub=stage2 grubcfg=(hd0,0)/win7.cfg

Then, I created a file WIN7.CFG with the following contents.


hiddenmenu
timeout 0
default 0

title Windows 7 Home Premium
loadslic (hd0,0)/lenovocb-01.bin
chainloader (hd0,5)+1

Wednesday, July 28, 2010

Checking Integrity of A Debian/Ubuntu System

Sometimes, a Linux filesystem becomes corrupted, system files are damaged, or some crucial files get lost. This often happens, regardless of which filesystem (ext2, ext3, ext4, jfs, reiserfs, reiser4, or xfs) is used. There are many possible reasons, such as:


  • Unstable hardware, for example, memory or hard drive problem
  • Overheat, power surge, quake or another environmental disaster
  • Buggy software, such as a bug in the kernel or the filesystem driver
  • Compromised security, for example, network intrusion or attack
  • Worm or virus infection


Files in Linux systems can be categorized into the following three:


  1. Verifiable System Files

    In Linux systems that are managed by packages (such as Debian and Ubuntu), these files are installed by packages and make up the bulk of the filesystem. These files reside in such directories as /bin, /lib, /sbin and /usr. They are usually static, which means they don't normally change except when the system is updated, or locally compiled binaries are installed.
  2. Changeable System Files

    These files are auxiliary system files for system configuration, initialization or customization, and system data (such as logs and cache). They reside in /boot, /etc, /opt, /srv and /var.
  3. User Data

    These files are created and used by superuser (a.k.a root) and normal users, or software-generated during casual user activities. Typically, they are in /home, /media, /mnt and /root.


This post focuses on verifiable system files (installed by packages). When the filesystem becomes corrupted (but not completely unreadable), it is possible to verify and restore the system integrity by using package checksums. Before you continue, make sure to fsck the filesystem.


e2fsck -r -v /dev/sda7


In this example, /dev/sda7 points to an ext2 partition we're going to check. Be aware that you cannot fsck a mounted filesystem. Therefore, boot with a Debian Live CD (or a Ubuntu CD) and run fsck. After you've performed fsck, there may be some files created in the /lost+found directory. We'll deal with them later. First, mount the filesystem.


mount -t ext2 /dev/sda7 /mnt


Go to /var/lib/dpkg/info. Then, concatenate all the md5sums files. Most, if not all, Debian and Ubuntu packages come with a md5sum file that we can use to check the integrity of the package and the files installed by the package.


cd /var/lib/dpkg/info
cat *.md5sums | sort > /dev/shm/all.md5


all.md5 has md5 checksums of all the files installed on the system. Now, check the files on the Debian/Ubuntu system against the concatenated md5sums file.


cd /
md5sum -c /dev/shm/all.md5 > /dev/shm/check.txt 2>&1


/dev/shm/check.txt now contains the results of the integrity check. It looks like this:


bin/bash: OK
bin/bunzip2: OK
bin/bzcat: FAILED


In this example, /bin/bzcat is damaged. To find all the missing or damaged files, use a command like this one:


grep -v ': OK$' /dev/shm/check.txt


Let's reinstall this file. First, find out which package this file belongs to.


dpkg -S /bin/bzcat


We'll see the following result.


bzip2: /bin/bzcat


Now we know that we need to reinstall bzip2. Let's download the package.


dpkg -p bzip2 | grep 'Filename: '


This command will let us know the name of the package to download. Use wget to download it.


wget ftp://ftp.us.debian.org/debian/pool/main/b/bzip2/bzip2_1.0.5-4_i386.deb


You can just reinstall the package.


dpkg -i bzip2_1.0.5-4_i386.deb


Or, you can just extract one file:


dpkg --fsys-tarfile bzip2_1.0.5-4_i386.deb | tar xf - ./bin/bzcat


Alternatively,


dpkg --fsys-tarfile bzip2_1.0.5-4_i386.deb | tar xOf - ./bin/bzcat > /mnt/bin/bzcat


To restore a file from the /lost+found directory, you can also use the MD5SUMS file. First, run md5sum on files in /lost+found.


cd /lost+found
md5sum *


You may get an output like this.


9aaa2176d20c1b1203e3abbac55a2513  #124531


To find out what #124531 file is originally, find its md5 checksum from the all.md5 file above.


grep 9aaa /dev/shm/all.md5


You'll get a result like this.


9aaa2176d20c1b1203e3abbac55a2513  bin/bzip2


Now you can just move it to its place.


mv \#124531 /mnt/bin/bzip2


After you restore all damaged files and restore files from /lost+found, you can find missing files in the system. Go to /var/lib/dpkg/info again and concatenate all the list files.


cd /var/lib/dpkg/info
cat *.list | sort | uniq > /dev/shm/all.txt


The .list files in the /var/lib/dpkg/info directore show the list of files installed by packages. Let's find what's missing from the system.


cd /
for f in $(cat /dev/shm/all.txt ); do test -e "$f" || echo "$f" >> /dev/shm/nonexist.txt ; done


The file /dev/shm/nonexist.txt will show which files are missing from the system. You can then replace the missing files as done previously.

Monday, July 26, 2010

Linux: Using dd To Back Up Hard Drive Partitions

I am going to use the omnipresent and omnipotent tool called dd to back up a hard drive partition. I am working with the drive /dev/sdb. First, I save a text file that has information on the partition table layout.


fdisk -l /dev/sdb > hdpt.txt
fdisk -l -u /dev/sdb >> hdpt.txt


Then, I choose the compression format to use for the backup archive.


  • gzip
  • bzip2
  • lzma
  • xz


My choice for the compression format is lzma which provides superior compression and faster decompression. The following command backs up a partition at /dev/sdb1 with dd and lzma.


dd if=/dev/sdb1 | lzma -9c > backup01.bin.lzma


To restore this backup later, use the following command:


lzcat backup01.bin.lzma | dd of=/dev/sdb1

Thursday, July 22, 2010

Linux Commands To Partition and Format a Drive

Partitioning


In addition to the wonderful gparted, we can also use fdisk to partition a disk:


fdisk /dev/sdb


The device names for hard disks and USB drives are typically /dev/sd?, for example, /dev/sda, /dev/sdb, /dev/sdc, etc. For Linux kernels 2.6.18 or older, IDE hard drives may be called /dev/hda, /dev/hdb, etc.


Formatting


To format a FAT16 partition:


mkdosfs -F 16 -n LABEL -r 512 -v /dev/sdb1


To format EXT2 partition:


mke2fs -L SID -v /dev/sdb2


To format a JFS partition:


jfs_mkfs -c -L Debian_Sid /dev/sdb2


Installing MBR


MBR is a boot code necessary for booting from the hard drive or USB flash.


install-mbr /dev/sdb -v --drive 0x80 --enable +12


Installing bootloaders


For SYSLINUX:


syslinux /dev/sdb1


Checking Filesystem Integrity


For FAT16/FAT32:


dosfsck -r -v -V /dev/sdb1

Saturday, July 10, 2010

List of Useful Software for Windows


I just finished setting up my laptop. It's got Windows 7 Home Premium installed. The following is a list of software I installed onto my laptop:


Related Posts


Wednesday, June 30, 2010

Install Windows XP on a USB flash/hard drive

I am building a new PC from old spare parts. The new PC will be used mainly for the Internet, so a hard drive won't be necessary unless there's a need to download music and movies. I'm going to put together a computer with no internal storage, but use a USB stick as the main storage. Windows XP Professional will be installed on the USB stick, and the computer will boot up from the USB stick. Here I show how to install XP onto a USB stick and boot the PC from it. You should have the following ready.


Let's begin.


  1. Get your Windows XP installation CD and copy its contents to an empty folder on the hard drive. If you don't have the CD, use utorrent or emule to download the ISO file.


    Then, use 7-zip to extract the contents of the ISO file into an empty folder.


  2. Start the Command Prompt, go to the I386 subfolder and type the following commands to uncompress the USB driver files:


    CD I386
    EXPAND -I USB.IN_
    EXPAND -I USBPORT.IN_
    EXPAND -I USBSTOR.IN_

    We'll get 3 new files: USB.INF, USBPORT.INF and USBSTOR.INF. Remove the original .IN_ files.


    ERASE USB.IN_ USBPORT.IN_ USBSTOR.IN_


  3. Edit TXTSETUP.SIF to include USB storage support at the initial stage of Windows XP installation. The highlighted entries were copied from the [InputDevicesSupport.Load] section to the [BootBusExtenders.Load] section:

    [BootBusExtenders.Load]
    pci = pci.sys
    acpi = acpi.sys
    isapnp = isapnp.sys
    acpiec = acpiec.sys
    ohci1394 = ohci1394.sys
    usbehci = usbehci.sys
    usbohci = usbohci.sys
    usbuhci = usbuhci.sys
    usbhub = usbhub.sys
    usbstor = usbstor.sys


    Likewise for [BootBusExtenders] and [InputDevicesSupport]:


    [BootBusExtenders]
    pci = "PCI Bus Driver",files.pci,pci
    acpi = "ACPI Plug & Play Bus Driver",files.acpi,acpi
    isapnp = "ISA Plug & Play Bus Driver",files.isapnp,isapnp
    acpiec = "ACPI Embedded Controller Driver",files.none,acpiec
    ohci1394 = "IEEE 1394 Bus OHCI Compliant Port Driver",files.ohci1394,ohci1394
    usbehci = "Enhanced Host Controller",files.usbehci,usbehci
    usbohci = "Open Host Controller",files.usbohci,usbohci
    usbuhci = "Universal Host Controller",files.usbuhci,usbuhci
    usbhub = "Generic USB Hub Driver",files.usbhub,usbhub
    usbstor = "USB Storage Class Driver",files.usbstor,usbstor


    Insert the following in the [HiveInfs.Fresh] section:


    [HiveInfs.Fresh]
    AddReg = hivedef.inf,AddReg
    AddReg = hivesys.inf,AddReg
    AddReg = hivesft.inf,AddReg
    AddReg = hivecls.inf,AddReg
    AddReg = hiveusd.inf,AddReg
    AddReg = dmreg.inf,DM.AddReg
    AddReg = usbboot.inf,usbservices


    Then, in the [SourceDisksFiles] section:


    [SourceDisksFiles]
    usbboot.inf = 1,,,,,,_x,3,,3
    bootvid.dll = 1,,,,,,3_,2,0,0,,1,2
    kdcom.dll = 1,,,,,,3_,2,0,0,,1,2


    Save and close TXTSETUP.SIF.


  4. Edit DOSNET.INF so that the second [Files] section looks like this:

    [Files]
    d1,usbboot.inf
    d1,_default.pif
    d1,12520437.cpx
    d1,12520850.cpx


  5. Edit USB.INF as follows:


    [StandardHub.AddService]
    DisplayName = %StandardHub.SvcDesc%
    ServiceType = 1 ; SERVICE_KERNEL_DRIVER
    StartType = 0 ; SERVICE_DEMAND_START
    ErrorControl = 1 ; SERVICE_ERROR_NORMAL
    ServiceBinary = %12%\usbhub.sys
    LoadOrderGroup = Boot Bus Extender

    [CommonClassParent.AddService]
    DisplayName = %GenericParent.SvcDesc%
    ServiceType = 1 ; SERVICE_KERNEL_DRIVER
    StartType = 0 ; SERVICE_DEMAND_START
    ErrorControl = 1 ; SERVICE_ERROR_NORMAL
    ServiceBinary = %12%\usbccgp.sys
    LoadOrderGroup = Boot Bus Extender


  6. Modify USBPORT.INF like this.


    [EHCI.AddService]
    DisplayName = %EHCIMP.SvcDesc%
    ServiceType = 1 ; SERVICE_KERNEL_DRIVER
    StartType = 0 ; SERVICE_DEMAND_START
    ErrorControl = 1 ; SERVICE_ERROR_NORMAL
    ServiceBinary = %12%\usbehci.sys
    LoadOrderGroup = Boot Bus Extender


    [OHCI.AddService]
    DisplayName = %OHCIMP.SvcDesc%
    ServiceType = 1 ; SERVICE_KERNEL_DRIVER
    StartType = 0 ; SERVICE_DEMAND_START
    ErrorControl = 1 ; SERVICE_ERROR_NORMAL
    ServiceBinary = %12%\usbohci.sys
    LoadOrderGroup = Boot Bus Extender


    [UHCI.AddService]
    DisplayName = %UHCIMP.SvcDesc%
    ServiceType = 1 ; SERVICE_KERNEL_DRIVER
    StartType = 0 ; SERVICE_DEMAND_START
    ErrorControl = 1 ; SERVICE_ERROR_NORMAL
    ServiceBinary = %12%\usbuhci.sys
    LoadOrderGroup = Boot Bus Extender


    [ROOTHUB.AddService]
    DisplayName = %ROOTHUB.SvcDesc%
    ServiceType = 1 ; SERVICE_KERNEL_DRIVER
    StartType = 0 ; SERVICE_DEMAND_START
    ErrorControl = 1 ; SERVICE_ERROR_NORMAL
    ServiceBinary = %12%\usbhub.sys
    LoadOrderGroup = Boot Bus Extender


  7. Edit USBSTOR.INF:


    [USBSTOR.AddService]
    DisplayName = %USBSTOR.SvcDesc%
    ServiceType = 1
    StartType = 0
    Tag = 3

    ErrorControl = 1
    ServiceBinary = %12%\USBSTOR.SYS
    LoadOrderGroup = Boot Bus Extender


  8. Create a new file USBBOOT.INF with the following contents:


    [usbservices]

    HKLM,"SYSTEM\CurrentControlSet\Services\USBSTOR","DisplayName",0x00000000,"USB Mass Storage Driver"
    HKLM,"SYSTEM\CurrentControlSet\Services\USBSTOR","ErrorControl",0x00010001,1
    HKLM,"SYSTEM\CurrentControlSet\Services\USBSTOR","Group",0x00000000,"System Reserved"
    HKLM,"SYSTEM\CurrentControlSet\Services\USBSTOR","ImagePath",0x00020000,"system32\DRIVERS\USBSTOR.SYS"
    HKLM,"SYSTEM\CurrentControlSet\Services\USBSTOR","Start",0x00010001,0
    HKLM,"SYSTEM\CurrentControlSet\Services\USBSTOR","Type",0x00010001,1

    HKLM,"SYSTEM\CurrentControlSet\Services\usbehci","DisplayName",0x00000000,"USB 2.0 Enhanced Host Controller Miniport Driver"
    HKLM,"SYSTEM\CurrentControlSet\Services\usbehci","ErrorControl",0x00010001,1
    HKLM,"SYSTEM\CurrentControlSet\Services\usbehci","Group",0x00000000,"System Reserved"
    HKLM,"SYSTEM\CurrentControlSet\Services\usbehci","ImagePath",0x00020000,"system32\DRIVERS\usbehci.sys"
    HKLM,"SYSTEM\CurrentControlSet\Services\usbehci","Start",0x00010001,0
    HKLM,"SYSTEM\CurrentControlSet\Services\usbehci","Type",0x00010001,1

    HKLM,"SYSTEM\CurrentControlSet\Services\usbhub","DisplayName",0x00000000,"USB2 Enabled Hub"
    HKLM,"SYSTEM\CurrentControlSet\Services\usbhub","ErrorControl",0x00010001,1
    HKLM,"SYSTEM\CurrentControlSet\Services\usbhub","Group",0x00000000,"System Reserved"
    HKLM,"SYSTEM\CurrentControlSet\Services\usbhub","ImagePath",0x00020000,"system32\DRIVERS\usbhub.sys"
    HKLM,"SYSTEM\CurrentControlSet\Services\usbhub","Start",0x00010001,0
    HKLM,"SYSTEM\CurrentControlSet\Services\usbhub","Type",0x00010001,1

    HKLM,"SYSTEM\CurrentControlSet\Services\usbuhci","DisplayName",0x00000000,"Microsoft USB Universal Host Controller Miniport Driver"
    HKLM,"SYSTEM\CurrentControlSet\Services\usbuhci","ErrorControl",0x00010001,1
    HKLM,"SYSTEM\CurrentControlSet\Services\usbuhci","Group",0x00000000,"System Reserved"
    HKLM,"SYSTEM\CurrentControlSet\Services\usbuhci","ImagePath",0x00020000,"system32\DRIVERS\usbuhci.sys"
    HKLM,"SYSTEM\CurrentControlSet\Services\usbuhci","Start",0x00010001,0
    HKLM,"SYSTEM\CurrentControlSet\Services\usbuhci","Type",0x00010001,1

    HKLM,"SYSTEM\CurrentControlSet\Services\usbohci","DisplayName",0x00000000,"Microsoft USB Open Host Controller Miniport Driver"
    HKLM,"SYSTEM\CurrentControlSet\Services\usbohci","ErrorControl",0x00010001,1
    HKLM,"SYSTEM\CurrentControlSet\Services\usbohci","Group",0x00000000,"System Reserved"
    HKLM,"SYSTEM\CurrentControlSet\Services\usbohci","ImagePath",0x00020000,"system32\DRIVERS\usbohci.sys"
    HKLM,"SYSTEM\CurrentControlSet\Services\usbohci","Start",0x00010001,0
    HKLM,"SYSTEM\CurrentControlSet\Services\usbohci","Type",0x00010001,1


  9. If you haven't erased the original .IN_ files, do so now.


    erase USB.IN_
    erase USBPORT.IN_
    erase USBSTOR.IN_

    Compress the modified files with cabarc.


    cabarc n USB.IN_ usb.inf
    cabarc n USBPORT.IN_ usbport.inf
    cabarc n USBSTOR.IN_ usbstor.inf

    You'll get 3 compressed files with IN_ extension.


  10. Put these files back into the I386 subfolder of the Windows XP installation folder.

    • DOSNET.INF
    • TXTSETUP.SIF
    • USB.IN_
    • USBBOOT.INF
    • USBPORT.IN_
    • USBSTOR.IN_


  11. You'll need this boot sector (w2ksect.bin) to make your new CD bootable. Put w2ksect.bin inside the main folder containing XP files.


  12. Now, let's burn a new CD containing Windows XP files. Start ImgBurn and select Write files/folders to disc. Click the Browser for a folder... icon and select the folder containing Windows XP files. Then, set up options as follows.


    Insert a blank CD into your optical drive and burn it.


  13. Plug in your USB flash drive or USB hard drive to your computer and run the HP USB Disk Storage Format Tool. On Windows Vista or Windows 7, run it as administrator.


  14. From the I386 folder of XP installation CD, copy the following files to the USB drive:


    • ntldr
    • ntdetect.com

    Then, create a new file boot.ini with the following contents. Put it on the USB drive.


    [boot loader]
    timeout=30
    default=multi(0)disk(0)rdisk(0)partition(1)\WINDOWS

    [operating systems]
    multi(0)disk(0)rdisk(0)partition(1)\WINDOWS="Microsoft Windows XP Professional" /fastdetect


  15. Run the Partition Table Editor (PTEDIT32.EXE) as administrator. Select your USB drive from Hard Disk pulldown menu.


    Change the type of primary partition on the USB drive from 00 to 80. Click the Save Changes button.


    Partition Information should read FAT16X, Bootable


  16. Remove your hard drive from the computer. Then, connect your USB flash drive directly to your computer.


  17. Change the boot order in the BIOS so that your computer can boot from a USB drive. Typical BIOS options are as follows:


    • USB HDD
    • USB Hard Drive


  18. Insert your new Windows XP CD your burned above and boot your computer with it. During installation, don't format the USB drive. Just leave it as is.


  19. After successfully installing Windows XP on your USB drive, install the EWF or FBWF filter.


Tuesday, June 29, 2010

Dumping the Contents of a Data CD into an ISO file

ISO files are used to burn Data CD's. If you want to share software CD's with someone far away, you can dump the contents of the CD into an ISO file and then transfer the ISO file to him.


For this job, readom from the cdrkit package can do. If you use Windows, download cygwin1.dll and readom.exe, then put them in C:\Windows and start the Command Prompt. Put the Windows XP CD in your CD-ROM (Assume CD-ROM's drive letter is D:) and run the following commands:

readom dev='D:' f='/home/Public/Downloads/dumped.iso' speed=2 retries=8 -noerror -nocorr

Assuming we're using Windows Vista or Windows 7, we'll find the dumped ISO file at C:\Users\Public\Downloads\dumped.iso.


Alternatively, we can use WinImage to dump the CD contents. From the Disk menu of WinImage, make sure “use CD-ROM D:” is checked. Then, select “Create CD-ROM ISO image...” from the Disk menu. If you get an access error, close any Windows Explorer, Media Player or file manager.


We can also use CDBurnerXP, InfraRecorder or ImgBurn to dump the CD contents to an ISO file.

Wednesday, June 2, 2010

Compiling GTK+ Theme Engines

The GTK+ widget library supports diverse customization of look and feel for GTK+ applications. This is achieved by installing a shared library (*.so or *.dll) that provides a particular GTK+ theme style. The default GTK+ theme engine (Raleigh) is too generic and old-fashioned to suit my style. The pixmap engine is too much of a resource hog, and the Wimp engine doesn't seem to work for GTK+ 2.18 and later releases.


My favorite GTK+ theme engines are thus:


  • Aurora engine
  • Candido engine
  • CleanIce engine
  • Clearlooks engine
  • Lighthouseblue engine
  • MagicChicken engine
  • Murrine engine
  • Nodoka engine
  • Rezlooks engine
  • Smooth engine
  • Wonderland engine


Compiling GTK+ Theme Engines 2.20.1


After building GTK+ 2 library, I can compile GTK+ theme engines, including Clearlooks and Lighthouseblue. I couldn't find the upstream release of gtk2-engines, so I downloaded the source from Debian Sid's page.


gtk2-engines requires intltool, so I compiled intltool first.


tar xzvf intltool-0.41.1.tar.gz
cd intltool-0.41.1
./configure --prefix=/mingw
make
make install

configure script will complain if xgettext, msgmerge and msgfmt are not found. I got these programs from my static gettext package I compiled previously.


Then, I compiled gtk-engines as follows:


tar xzvf gtk2-engines_2.20.1.orig.tar.gz
cd gtk-engines-2.20.1/
./configure --prefix=/mingw --disable-deprecated --enable-animation
make

I only wanted clearlooks, so I copied libclearlooks.dll.


find -iname \*dll
cp ./engines/clearlooks/.libs/libclearlooks.dll /mingw/lib/gtk-2.0/2.10.0/engines


Compiling Aurora Theme Engine


I downloaded the Aurora source from here and unpack it. I compiled Aurora like this:


./configure --prefix=/mingw --enable-animation
make
make install


Cygwin: Compiling Smooth Theme Engine


The source code of smooth theme engine can be downloaded from here. Compiling is easy:


./configure --prefix=/usr
make
make install

Monday, May 31, 2010

Compiling GTK+ for Windows with MinGW

GTK+ is a set of open-source widget libraries that are mature, functional and portable. GTK+ library is mainly used by many Linux programs. I am building a complete stack of GTK+ 2.x library before beginning my programming projects. This tutorial makes use of the free MinGW compiler to build GTK+.


If you haven't installed MinGW yet, read this tutorial on installing MinGW in Windows. Alternatively, you can also install MinGW Portable on your USB flash drive so you can enjoy compiling anywhere. GTK+ depends on many basic libraries that provide image, localization, font and other functions. These prerequisite libraries have be compiled first. Once you've installed MinGW and MSYS, launch MSYS. The following steps require you to type commands into MSYS console.


  1. Zlib 1.2.7


    Zlib is an essential compression library required by png, tiff and cairo. Get the zlib source and unpack it:

    tar xzvf zlib-1.2.7.tar.gz
    cd zlib-1.2.7/

    Compile zlib like this:


    make -f win32/Makefile.gcc

    Then, manually copy the files as follows:


    cp -iv zlib1.dll /mingw/bin
    cp -iv zconf.h zlib.h /mingw/include
    cp -iv libz.a /mingw/lib
    cp -iv libz.dll.a /mingw/lib


  2. libiconv 1.14


    libiconv is a character-set conversion library, and is needed by gettext. Download the libiconv source and compile libiconv:


    ./configure --prefix=/mingw
    make
    make install


  3. gettext 0.18.1.1


    GNU gettext is a tool for localizing and translating programs. Build gettext like this:


    ./configure --prefix=/mingw --enable-threads=win32 --enable-relocatable
    cd gettext-runtime/
    make
    make install


  4. glib 2.32.4


    glib's configure script requires pkg-config.exe and msgfmt.exe in the PATH. Download the executables and save them in /mingw/bin. Remember to set the system-wide environment variable PKG_CONFIG_PATH:


    export PKG_CONFIG_PATH=/mingw/lib/pkgconfig

    glib 2.30 and later depends on libffi. Compile libffi like this:


    ./configure --prefix=/mingw && make && make install

    Then, get the glib source from ftp.gnome.org and compile glib as follows:


    ./configure --prefix=/mingw --with-threads=win32 --with-pcre=internal --disable-debug
    make
    make install


  5. ATK 2.4.0


    Download ATK from here. Compile it like this:


    ./configure --prefix=/mingw
    make
    make install


  6. libpng 1.5.12


    PNG can be compiled like this:


    ./configure --prefix=/mingw
    make
    make install


  7. Optional libraries


    The following libraries are optional, but many GTK+ packages include them. It's up to you to decide whether to compile them or not.


    As usual, compile any of them like this:


    ./configure --prefix=/mingw && make && make install


  8. Pixman 0.26.2 and Cairo 1.12.2


    Get Pixman and Cairo from cairographics.org. Compile Pixman as follows:


    ./configure --prefix=/mingw

    make

    make install

    Then, compile cairo:


    ./configure --prefix=/mingw --enable-pthread
    make
    make install


  9. Pango Library 1.30.1


    Compile Pango like this:


    ./configure --prefix=/mingw --with-included-modules=yes

    make

    make install


  10. gdk-pixbuf 2.26.2


    Download and compile gdk-pixbuf:


    ./configure --prefix=/mingw --without-libjasper --with-included-loaders=yes --disable-modules --disable-debug
    make
    make install


  11. GTK+ 2.24.11 and GTK+ 3.4.2


    At last, we are ready to compile GTK+ for Windows. I compiled GTK+ like this:


    ./configure --prefix=/mingw --with-included-immodules=ime --disable-modules --disable-debug

    make

    make install


    To test your newly compiled GTK+ library, run gtk-demo.exe or testgtk.exe.


Wednesday, May 19, 2010

My Windows Vista/7 Power Settings

Here are my power settings on Windows Vista or Windows 7. I find the default setting annoying or inadequate, especially the Start menu power button triggering sleep.


  • Lid Close Action
    • On Battery: Sleep
    • Plugged in: Do nothing


  • Power Button Action
    • On Battery: Hibernate
    • Plugged in: Hibernate


  • Sleep Button
    • On Battery: Sleep
    • Plugged in: Hibernate


  • Start menu power button
    • On Battery: Shut down
    • Plugged in: Shut down

Sunday, May 16, 2010

Using Mencoder To Merge AVI Files

Merging 2 AVI files can be easily accomplished with mencoder. But the two AVI files must be encoded with the same video and audio codec. Assuming that you have part1.avi and part2.avi, seamlessly consecutive, the mencoder command to concatenate them is:


mencoder -ovc copy -oac copy -o whole.avi part1.avi part2.avi

Wednesday, May 5, 2010

Using VLC to Dump a DVD title

VLC is a free, powerful media player for Windows, Mac and Linux. I've used VLC mainly for playing Movies. Sometimes, I use VLC to listen to Internet radio. I seldom use VLC to rip DVD's but VLC can come in handy when dealing with tricky DVD titles. For DVD titles with mixed VOB ID's, VLC can be used to dump such DVD titles. Follow the steps below:


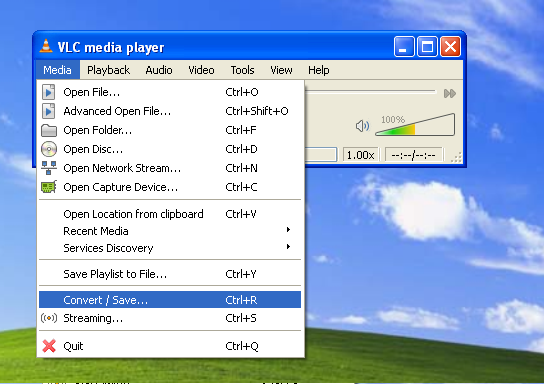
  1. From the Media menu of VLC, select Convert/Save...

    VLC Media Convert
  2. Choose the Disc tab. In the Disc Selection area, choose DVD and check No DVD menus. Type in the drive letter (for example, F:\) for your DVD drive. The main title number is typically 1, but may vary. Audio track is usually 0 for the primary language (English) and 1 for secondary lanuage (French or Spanish). Click Convert/Save button.


  3. In the next Convert window, click the Create a new profile button.


  4. Name the new profile as Copy Without Conversion. In the Video codec tab, check both options Video and Keep original video track.


    In the Audio codec tab, check both options Audio and Keep original audio track.


    Leave anything else as is. Click Save.


  5. Back to the Convert window, type in the name for Destination file (E:\output.ts). For the profile, select the newly created profile (Copy Without Conversion) from the dropdown list. Click Start.


  6. VLC starts saving the DVD title to a disk file.


Although VLC has many built-in functions for ripping DVD's and converting movies, I don't have much experience with them. I think VLC's transcoding function is premature.


After VLC finishes conversion, you'll get an output file (output.ts) whose size may be up to several gigabytes. Now, use mencoder to transcode it.


Related Links


Friday, April 30, 2010

Compile wxDownload Fast for Windows

I once used wxDownload Fast as a tool for getting something off the Web quickly. But it crashes every once in a while. So I stopped using it long ago. Now I am compiling wxDownload Fast only to test my static wxMSW library.


I am using MinGW GCC compiler to build wxDownload Fast. I downloaded the source for wxDownload Fast. I unpacked the source and configured it:


tar xzvf wxdfast_0.6.0.tar.gz
cd wxdfast-0.6.0/
./configure --prefix=/mingw --enable-win32build


I got some errors during the final linking stage. I had to modify src/Makefile to fix the errors. The end of Makefile was modified.


wxDFast.res: wxDFast.rc
windres -i $< -J rc -O coff -o $@ --include-dir=/mingw/include/wx-2.8


The other fix involves linking with expat because my wxMSW library depends on expat.


wxdfast$(EXEEXT): $(wxdfast_OBJECTS) $(wxdfast_DEPENDENCIES) 
@rm -f wxdfast$(EXEEXT)
$(CXXLINK) $(wxdfast_LDFLAGS) $(wxdfast_OBJECTS) $(wxdfast_LDADD) $(LIBS) -lexpat


Then, I started make.


make
make install


I double-clicked wxdfast and it started alright. The following files are installed onto the system (under the MinGW folder).


./bin/wxdfast.exe
./share/applications/wxdfast.desktop
./share/locale/cs/LC_MESSAGES/wxDFast.mo
./share/locale/de/LC_MESSAGES/wxDFast.mo
./share/locale/es/LC_MESSAGES/wxDFast.mo
./share/locale/fr/LC_MESSAGES/wxDFast.mo
./share/locale/hu/LC_MESSAGES/wxDFast.mo
./share/locale/id/LC_MESSAGES/wxDFast.mo
./share/locale/nl/LC_MESSAGES/wxDFast.mo
./share/locale/pl/LC_MESSAGES/wxDFast.mo
./share/locale/pt_BR/LC_MESSAGES/wxDFast.mo
./share/locale/ru/LC_MESSAGES/wxDFast.mo
./share/locale/tr/LC_MESSAGES/wxDFast.mo
./share/man/man1/wxdfast.1
./share/man/pt_BR/man1/wxdfast.1
./share/pixmaps/wxdfast.png
./share/wxdfast/RipStop/icon/dfast48x48.png
./share/wxdfast/RipStop/icon/wxdfast.ico
./share/wxdfast/RipStop/icon/wxdfast.png
./share/wxdfast/RipStop/license.txt
./share/wxdfast/RipStop/logo/about.png
./share/wxdfast/RipStop/menubar/about.png
./share/wxdfast/RipStop/menubar/completed.png
./share/wxdfast/RipStop/menubar/copydata.png
./share/wxdfast/RipStop/menubar/copyurl.png
./share/wxdfast/RipStop/menubar/details.png
./share/wxdfast/RipStop/menubar/downloading.png
./share/wxdfast/RipStop/menubar/error.png
./share/wxdfast/RipStop/menubar/find.png
./share/wxdfast/RipStop/menubar/graph.png
./share/wxdfast/RipStop/menubar/help.png
./share/wxdfast/RipStop/menubar/new.png
./share/wxdfast/RipStop/menubar/options.png
./share/wxdfast/RipStop/menubar/pasteurl.png
./share/wxdfast/RipStop/menubar/pause.png
./share/wxdfast/RipStop/menubar/progressbar.png
./share/wxdfast/RipStop/menubar/properties.png
./share/wxdfast/RipStop/menubar/quit.png
./share/wxdfast/RipStop/menubar/remove.png
./share/wxdfast/RipStop/menubar/schedule.png
./share/wxdfast/RipStop/menubar/scheduled.png
./share/wxdfast/RipStop/menubar/start.png
./share/wxdfast/RipStop/menubar/startall.png
./share/wxdfast/RipStop/menubar/stop.png
./share/wxdfast/RipStop/menubar/stopall.png
./share/wxdfast/RipStop/preview/ripstop.png
./share/wxdfast/RipStop/preview/wxdownloads_small.png
./share/wxdfast/RipStop/readme.txt
./share/wxdfast/RipStop/svg/ripstop.svg
./share/wxdfast/RipStop/svg/wxdownloads_small.svg
./share/wxdfast/RipStop/toolbar/download_info.png
./share/wxdfast/RipStop/toolbar/download_move_down.png
./share/wxdfast/RipStop/toolbar/download_move_up.png
./share/wxdfast/RipStop/toolbar/download_new.png
./share/wxdfast/RipStop/toolbar/download_remove.png
./share/wxdfast/RipStop/toolbar/download_schedule.png
./share/wxdfast/RipStop/toolbar/download_start.png
./share/wxdfast/RipStop/toolbar/download_start_all.png
./share/wxdfast/RipStop/toolbar/download_stop.png
./share/wxdfast/RipStop/toolbar/download_stop_all.png
./share/wxdfast/boxabout.xrc
./share/wxdfast/boxnew.xrc
./share/wxdfast/boxoptions.xrc
./share/wxdfast/images.xrc
./share/wxdfast/mainwindow.xrc
./share/wxdfast/menubar.xrc
./share/wxdfast/toolbar.xrc
./share/wxdfast/xpm/big/close.xpm
./share/wxdfast/xpm/big/down.xpm
./share/wxdfast/xpm/big/new.xpm
./share/wxdfast/xpm/big/properties.xpm
./share/wxdfast/xpm/big/remove.xpm
./share/wxdfast/xpm/big/schedule.xpm
./share/wxdfast/xpm/big/start.xpm
./share/wxdfast/xpm/big/startall.xpm
./share/wxdfast/xpm/big/stop.xpm
./share/wxdfast/xpm/big/stopall.xpm
./share/wxdfast/xpm/big/up.xpm
./share/wxdfast/xpm/small/error.xpm
./share/wxdfast/xpm/small/exit.xpm
./share/wxdfast/xpm/small/graph.xpm
./share/wxdfast/xpm/small/new.xpm
./share/wxdfast/xpm/small/noresume.xpm
./share/wxdfast/xpm/small/ok.xpm
./share/wxdfast/xpm/small/options.xpm
./share/wxdfast/xpm/small/paste.xpm
./share/wxdfast/xpm/small/progress.xpm
./share/wxdfast/xpm/small/properties.xpm
./share/wxdfast/xpm/small/queue.xpm
./share/wxdfast/xpm/small/remove.xpm
./share/wxdfast/xpm/small/resume.xpm
./share/wxdfast/xpm/small/schedule.xpm
./share/wxdfast/xpm/small/start.xpm
./share/wxdfast/xpm/small/startall.xpm
./share/wxdfast/xpm/small/stop.xpm
./share/wxdfast/xpm/small/stopall.xpm
./share/wxdfast/xpm/small/wxdfast.xpm
./share/wxdfast/xpm/wxdfast.ico
./share/wxdfast/xpm/wxdfast.xpm

Sunday, April 25, 2010

Setting Up Codecs For Windows 7

Although Windows 7 provides wider support for multimedia files, including H.264, XviD, DIVX and AAC, Windows Media Player 12 has some bugs, such as jittery DVD sound. For satisfying multimedia experience in Windows 7, one needs to take some steps to set up additional codecs. Though ffdshow is a comprehensive codec package, I am going to use alternative codecs other than ffdshow.


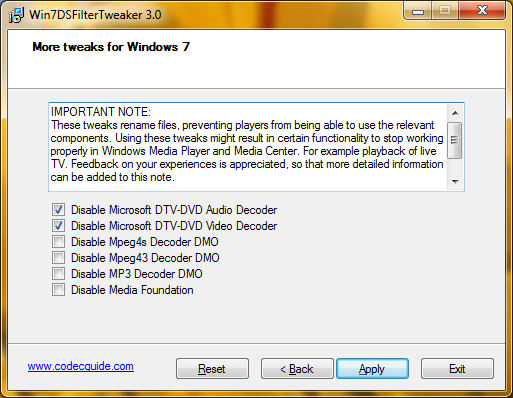
  1. Go to C:\Windows\System32 and rename msmpeg2adec.dll and msmpeg2vdec.dll. Alternatively, run Win7DSFilterTweaker and check both Disable Microsoft DTV-DVD Audio decoder and Disable Microsoft DTV-DVD Video decoder.

    Win7DSFilterTweaker 3.0


  2. Install DirectShow FilterPack (DSFP.zip) which only contains DirectShow source filters and splitters, but no codecs. Unpack the package (DSFP-3.32.exe) into C:\Program Files. Start the Command Prompt (cmd.exe) as administrator and run the batch file DSFP_inst.bat.

    cd "C:\Program Files\DirectShow FilterPack"
    DSFP_inst.bat


  3. Install XviD codec.

  4. Install AC3filter which allows Media Player to play AC3 and DTS sound.

  5. Install DirectShow filters for Ogg Vorbis, Speex, Theora and FLAC from xiph.org.

  6. Obtain CLVsd.ax from the Web and run the following command in an elevated Command Prompt.

    regsvr32 CLVsd.ax

    CLVsd.ax can be obtained this way:


    • Download PowerDVD from filehippo.
    • Right-click the installer (CyberLink.1705(Trial)_DVD100510-04.exe) and open it with 7-zip.
    • Right-click data1.cab and choose Open Inside.
    • Extract the file _64A6CC87C2FD46EDBDBCC13164131D6A (1,086,832 bytes) to C:\Windows\System32 folder.
    • Rename _64A6CC87C2FD46EDBDBCC13164131D6A as CLVsd.ax.
    • Run "regsvr32 CLVsd.ax" as administrator.


  7. Open the registry editor (regedit) and navigate to HKLM\SOFTWARE\Microsoft\Windows\CurrentVersion\Media Center\Decoder and find the entry PreferredMPEG2VideoDecoderCLSID. Double-click the entry and enter {516F1EFA-42F4-436E-801C-B752EB9343EB} (UUID for Cyberlink decoder). You can verify the CLSID with Radlight Filter Manager (DSFM.exe) that was installed by DirectShow FilterPack above.

  8. Download the DirectVobSub filter, also known as VSfilter. Copy VSFilter.dll to C:\Windows\System32 and run the following command:

    regsvr32 VSFilter.dll


Saturday, April 24, 2010

MinGW: To Compile Vorbis Tools

Vorbis tools include oggenc and vorbiscomment that can be used to produce Ogg-Vorbis music files. Ogg Vorbis provides people with free, open-source audio format and encoding algorithm. Because the MP3 algorithm is patented and creating MP3 exposes people to legal risks, use of the Ogg Vorbis format is a reasonable choice for legally conscious people. Besides its openness and patent-free characteristics, Ogg Vorbis offers good compression and sound quality, comparable to MP3 and AAC. Therefore, everyone is recommended to create, use and spread Ogg Vorbis music files, instead of MP3 and AAC.


To learn how to prepare a MinGW environment, read this post. Then, download the source for libogg, libvorbis and vorbis-tools from xiph.org.


To build Vorbis tools, libogg and libvorbis should be compiled first. Start the MinGW rxvt console from the Start menu. Unpack the libogg source and compile it as follows:


tar xzvf libogg-1.2.0.tar.gz
cd libogg-1.2.0/
./configure --prefix=/mingw
make
make install


libvorbis can be compiled likewise:


tar xzvf libvorbis-1.3.1.tar.gz
cd libvorbis-1.3.1/
./configure --prefix=/mingw
make
make install


Then, build vorbis-tools as follows:


tar xzvf vorbis-tools-1.4.0.tar.gz
cd vorbis-tools-1.4.0/
./configure --prefix=/mingw --disable-nls --enable-threads=win32
make
make install


When done, the following files are created in /mingw/bin:


libogg-0.dll
libvorbis-0.dll
libvorbisenc-2.dll
libvorbisfile-3.dll
oggdec.exe
oggenc.exe
ogginfo.exe
vorbiscomment.exe


Copy these files whereever you want. To create an Ogg Vorbis file from a .WAV file, use a command like this:


oggenc -q5 audio.wav


Related Posts


Wednesday, April 21, 2010

Using IFOEdit To Dump a DVD Stream

I was using MPlayer to rip a DVD, but had a trouble dumping the third DVD title that was stored in the same VOB stream as the second DVD title. Running mplayer dvd://2 -dvd-device E:\ -vf cropdetect -identify showed the following output:


Playing dvd://2.
ID_DVD_TITLES=3
ID_DVD_TITLE_1_CHAPTERS=2
ID_DVD_TITLE_1_ANGLES=1
ID_DVD_TITLE_2_CHAPTERS=6
ID_DVD_TITLE_2_ANGLES=1
ID_DVD_TITLE_3_CHAPTERS=6
ID_DVD_TITLE_3_ANGLES=1
ID_DVD_TITLE_1_LENGTH=0.800
ID_DVD_TITLE_2_LENGTH=3196.467
ID_DVD_TITLE_3_LENGTH=3167.333


As can be seen, the longest titles are the main titles. I could dump the second DVD title with the following command:


mplayer dvd://2 -dvd-device E:\ -v -dumpstream -dumpfile title2.vob


But running mplayer dvd://3 -dvd-device E:\ -v -dumpstream -dumpfile title3.vob or mplayer dvd://3 -dvd-device E:\ crashed mplayer with the following error:


DVD Seek! lba=0xFFF08207 cell=0 packs: 0x108207-0x11AFA8

stream_seek: WARNING! Can't seek to 0xFFFFFFFF84103800 !

Core dumped ;)


I supposed this error is due to DVD copy protection. In this case, the DVD had two episodes of a show, but the episodes were stored in the same set of *.VOB files, specifically:


VTS_01_0.IFO
VTS_01_0.VOB
VTS_01_1.VOB
VTS_01_2.VOB
VTS_01_3.VOB
VTS_01_4.VOB
VTS_01_5.VOB


The first episode was in VTS_01_1.VOB, VTS_01_2.VOB and the beginning part of VTS_01_3.VOB whereas the second episode was in the latter part of VTS_01_3.VOB, VTS_01_4.VOB and VTS_01_5.VOB. I tried mplayer but couldn't extract the DVD title I wanted.


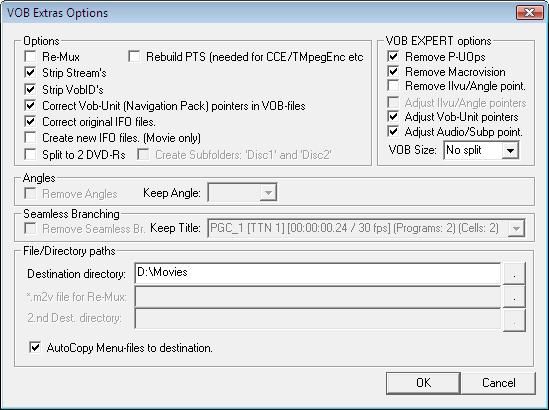
So I started IfoEdit which is useful for DVD authoring and fixing. I opened VTS_01_0.IFO in IfoEdit and clicked the VOB Extras button at the bottom of IfoEdit window. Specify the destination directory and click OK.


VOB Extras Options

In the next dialogs, choose the Audio track and the video stream you want to include in the output.

Sunday, April 11, 2010

Tools for Downloading Stuff from the Internet

You can get a variety of software, music and movies from the Internet. Some of them are legally okay to download like open-source software and free publications, but there are things you're not legally allowed to download, such as most music and movies. However, with the increasing availability of high-speed Internet and P2P software, the Internet is exponentially growing in the number of downloadable stuff.

There are so many software for downloading stuff from the Net, but only a few good ones are listed here.


  • amule

    Multi-platform program for downloading from ed2k or Kad networks.
  • aria2

    Command-line tool for downloading from Web, FTP, Bittorrent and Metalinks. Very Light , Fast and Efficient.
  • eMule

    Old-school ed2k client for downloading from eDonkey or Kademlia networks.
  • Frostwire

    Limewire clone that allows you to download from Gnutella or Bittorrent network.
  • gtk-gnutella

    Open-source Linux/*BSD client for Gnutella network.
  • HalogenWare Retriever

    Java software for downloading from HTTP, FTP, Bittorrent and Metalinks.
  • MLDonkey and Sancho

    Yet another eDonkey client
  • Phex

    Gnutella client that keeps getting better
  • Transmission bittorrent client

    I like to compile transmission-daemon and use it with a GUI frontend, such as transmission-remote-gui
    and transmission-remote-dotnet.
  • wxDownload Fast

    simple wxWidgets application that lets you quickly download from FTP and HTTP. Read my guide to compiling it here.


Once you have P2P software installed, you'll want to know more about how to search for files on the Internet. The following is a list of search engines for P2P users.


Friday, April 9, 2010

MinGW: Building TwoLAME

TwoLAME is MPEG-2 audio encoder. First, compile libsndfile which is used is read sound files in various formats.


tar xzvf libsndfile-1.0.21.tar.gz
cd libsndfile-1.0.21/
./configure --prefix=/mingw --disable-shared --enable-static
make
make install

Then, build twolame.


tar xzvf twolame-0.3.12.tar.gz
cd twolame-0.3.12/
./configure --prefix=/mingw CPPFLAGS='-DLIBTWOLAME_STATIC'
make
make install

When linking a program with a static TwoLAME library, define LIBTWOLAME_STATIC with CPPFLAGS.


CPPFLAGS=' -DLIBTWOLAME_STATIC' ./configure --enable-static --enable-twolame

MinGW: MPlayer와 Mencoder 동적 컴파일하기

MinGW의 GCC 컴파일러를 사용하여 Windows용 MPlayer와 Mencoder를 컴파일해 보자. MPlayer는 동영상을 보는 프로그램이고 Mencoder는 동영상이나 음악을 인코딩하는 프로그램이다. 예전에는 정적으로 컴파일하였지만 이번에는 동적으로 컴파일해 보자.


우선 MinGW를 설치한다. MPlayer는 FFmpeg 라이브러리에 의존하므로 먼저 FFmpeg 라이브러리를 동적으로 컴파일하도록 한다.


시작 메뉴를 열어 MinGW (rxvt)를 실행한다. 노란 창이 나타날 것이다. 그럼 다음과 같이 MPlayer와 의존 라이브러리를 컴파일하자.


  1. LZO 압축 라이브러리 컴파일 (옵션)

    tar xzvf lzo-2.03.tar.gz
    cd lzo-2.03/
    ./configure --prefix=/mingw
    make
    make install


  2. Fribidi 라이브러리 컴파일 (옵션)

    Fribidi는 아랍어와 히브리어의 표시에 필요하다. 솔직히 이 기능은 빠뜨려도 된다.

    tar xzvf fribidi-0.19.2.tar.gz
    cd fribidi-0.19.2/
    ./configure --prefix=/mingw --disable-debug
    make
    make install

    자세한 내용은 Fribidi에 관한 글을 참조.

  3. giflib 라이브러리 컴파일 (옵션)

    tar xjvf giflib-4.1.6.tar.bz2 
    cd giflib-4.1.6/
    ./configure --prefix=/mingw
    make
    make install


  4. Live555 라이브러리 컴파일 (권장)

    Live 라이브러리는 인터넷 동영상을 보는 데 쓰인다. live555.com에서 최신 버전을 받아 다음과 같이 컴파일한다:

    export CC=/mingw/bin/gcc.exe
    cd /mingw/lib/
    tar xzvf live.2010.04.01.tar.gz
    cd live/
    ./genMakefiles mingw
    make


  5. JPEG 라이브러리 컴파일 (권장)

    tar xzvf jpegsrc.v8a.tar.gz
    cd jpeg-8a/
    ./configure --prefix=/mingw
    make
    make install


  6. PNG 라이브러리 컴파일 (권장)

    tar xzvf libpng-1.4.1.tar.gz 
    cd libpng-1.4.1
    ./configure --prefix=/mingw
    make
    make install


  7. FreeType 라이브러리 컴파일 (필수)

    자막 표시에 필요하다.

    그리고 Freetype를 컴파일한다.

    tar xzvf freetype-2.3.12.tar.gz 
    cd freetype-2.3.12/
    ./configure --prefix=/mingw
    make install


  8. 만일 iconv 라이브러리가 설치되어 있지 않다면 컴파일한다. libXML2 그리고 fontconfig 에 필요하다.

  9. libXML2 컴파일

    만약에 fontconfig 라이브러리를 컴파일하려면 필요하다. 먼저 testThreads.c를 고친다.

    --- testThreads.c.orig  2009-09-11 18:09:00.268640135 +0200
    +++ testThreads.c 2009-09-11 18:12:43.412653512 +0200
    @@ -107,7 +107,7 @@

    for (i = 0; i < num_threads; i++) {
    results[i] = NULL;
    - tid[i] = (pthread_t) -1;
    + memset(&tid[i], 0, sizeof(pthread_t));
    }

    for (i = 0; i < num_threads; i++) {

    그리고 컴파일한다:


    ./configure --prefix=/mingw
    make install


  10. Fontconfig 라이브러리 컴파일 (권장)

    SSA 자막 표시에 필요하다.

    tar xzvf fontconfig-2.8.0.tar.gz 
    cd fontconfig-2.8.0/
    ./configure --prefix=/mingw
    make install


  11. Libcdio 컴파일 (옵션)

    tar xzvf libcdio-0.83.tar.gz 
    cd libcdio-0.83/
    ./configure --prefix=/mingw
    make
    make install


  12. Libdca 컴파일 (권장)

    tar xjvf libdca-0.0.5.tar.bz2 
    cd libdca-0.0.5/
    ./configure --prefix=/mingw
    make install


  13. DirectX 7 라이브러리 추출 (권장)

    cd /mingw/include/
    tar xzvf dx7headers.gz


  14. MPlayer, Mencoder 컴파일

    ffmpeg 소스를 받아서 mplayer 소스 디렉토리에 넣는다.

    tar xjvf mplayer-export-snapshot.tar.bz2

    cd mplayer-export-2011-11-25/

    tar xjvf ffmpeg-snapshot.tar.bz2

    CPPFLAGS='-DWIN32 -DHAVE_INT32_T' ./configure --prefix=/mingw --enable-runtime-cpudetection --enable-theora --enable-fribidi --disable-ffmpeg_a --yasm=/mingw/bin/yasm

    MPlayer를 컴파일하기 전에 config.mak를 텍스트 에디터(notepad.exe)로 수정한다.

    EXTRALIBS_MPLAYER  = -lgdi32 -lopengl32 -lwinmm -lfaac -lx264 -lmp3lame -lfribidi
    EXTRALIBS_MENCODER = -lfaac -lx264 -lfribidi -lmp3lame

    MPlayer 컴파일 시작한다.

    make

  15. MPlayer.exe와 Mencoder.exe를 복사한다.

    strip mencoder.exe mplayer.exe
    cp -iv m*.exe /mingw/bin

About This Blog

KBlog logo This blog seeks to provide a collection of interesting pictures found on the Web. Thanks for visiting the blog and posting your comments.

© Contents by KBlog

© Blogger template by Emporium Digital 2008

Followers

Total Pageviews

Powered By Blogger