Monday, December 26, 2011

Compiling MLDonkey for Windows

MLDonkey is a nifty program that helps you share files with other people. MLDonkey works on Linux, but the Windows version I downloaded didn't work on my computer running Windows XP. So I compiled MLDonkey using Cygwin's mingw64-i686-gcc-* compiler toolchain. Here I show how I did it. Part of the information below is taken from the MLDonkey Windows guide.


  1. Cygwin Setup

    First, install Cygwin using the Cygwin installer(setup.exe). I set the Root directory to C:\Cygwin and chose to install the following packages in addition to base packages.


    • bison

    • gettext-devel

    • libtool

    • make

    • mingw64-i686-binutils

    • mingw64-i686-gcc-core

    • mingw64-i686-gcc-fortran

    • mingw64-i686-gcc-g++

    • patch

    • pkg-config


  2. Open the file C:\Cygwin\etc\fstab in a text editor and append the following line.


    /usr/i686-w64-mingw32/sys-root/mingw /mingw none bind


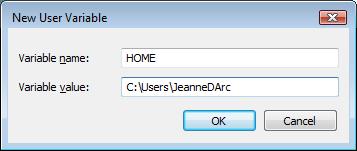
    Set the HOME variable.


    Start the Cygwin terminal and type the following commands to set up Cygwin for Windows compilation.


    cp /usr/bin/i686-w64-mingw32-g++.exe /usr/i686-w64-mingw32/bin/g++.exe
    cp /usr/bin/i686-w64-mingw32-gcc.exe /usr/i686-w64-mingw32/bin/gcc.exe
    cp /usr/bin/i686-w64-mingw32-cpp.exe /usr/i686-w64-mingw32/bin/cpp.exe
    export PATH=/mingw/bin:/usr/i686-w64-mingw32/bin:/usr/local/bin:/usr/bin:/usr/lib/gcc/i686-w64-mingw32/4.5.3
    export CC=/usr/bin/i686-w64-mingw32-gcc.exe
    export PKG_CONFIG_PATH=/mingw/lib/pkgconfig

  3. Compile zlib and bzip2

    Download the zlib source (zlib-1.2.7.tar.gz) and unpack it.


    tar xzvf zlib-1.2.7.tar.gz
    cd zlib-1.2.7

    Compile and install zlib.


    make -f win32/Makefile.gcc
    cp -iv zlib1.dll /mingw/bin
    cp -iv zconf.h zlib.h /mingw/include
    cp -iv libz.a /mingw/lib
    cp -iv libz.dll.a /mingw/lib

    Now download bzip2 source from bzip2.org and unpack it.


    tar xzvf bzip2-1.0.6.tar.gz
    cd bzip2-1.0.6

    Change line 78 of bzlib.h to read:


    #if defined(_WIN32) && !defined(__MINGW32__)

    Compile and install bzip2.


    make
    cp bzlib.h /mingw/include/
    cp libbz2.a /mingw/lib


  4. libiconv

    Download and compile libiconv:


    tar xzvf libiconv-1.14.tar.gz
    cd libiconv-1.14
    ./configure --build=i686-w64-mingw32 --prefix=/mingw --enable-static
    make
    make install


  5. JPEG, PNG & Freetype

    Compile JPEG, libPNG and Freetype in the following way:


    ./configure --build=i686-w64-mingw32 --prefix=/mingw
    make
    make install


  6. GD Graphics Library

    Now get the libgd source, unpack and configure:


    ./configure --build=i686-w64-mingw32 --prefix=/mingw LIBS="-lbz2 -ljpeg -lws2_32 -liconv"

    Once Makefile is generated, change line 233 to read:


    DEFS = -DHAVE_CONFIG_H -DBGDWIN32

    Also fix gd.h near line 25:


    --- ./gd.h      Sat Oct 30 12:54:58 2004
    +++ ./gd.h Sun Jan 05 17:56:09 2006
    @@ -24,7 +24,7 @@
    #endif /* WIN32 */

    #ifdef NONDLL
    -#define BGD_DECLARE(rt) extern rt
    +#define BGD_DECLARE(rt) extern rt _stdcall
    #else
    #ifdef BGDWIN32
    #define BGD_DECLARE(rt) __declspec(dllexport) rt __stdcall

    Then, build and install gdlib:


    make install


    To create a DLL file called libgd-2.dll, run the following commands:


    mkdir /tmp/gdlib
    cd /tmp/gdlib
    ar x /mingw/lib/libgd.a
    gcc -shared -o /mingw/bin/libgd-2.dll -Wl,--out-implib,libgd.dll.a *.o -L/mingw/lib -lz -lbz2 -ljpeg -lpng -liconv -lfreetype


  7. wget

    Build wget as shown in this post. If you don't want to compile wget yourself, get the executable (wget.exe) somewhere, and put it in the same folder as mlnet.exe later.

  8. regex and libmagic

    Download regex-0.12.tar.gz and compile regex as required by libmagic.


    gcc -DSTDC_HEADERS -DHAVE_STRING_H=1 -I. -c regex.c
    ar ru libregex.a regex.o
    cp -iv libregex.a /mingw/lib
    cp -iv libregex.a /mingw/lib/libgnurx.a
    cp -iv regex.h /mingw/include

    Get the source tarball of open-source file command. Configure as follows:


    ./configure --build=i686-w64-mingw32 --prefix=/mingw

    Open config.h and add the following lines:


    #define WIN32 1
    #define MAGIC "magic"

    Then compile:


    make && make install


  9. OCaml

    You need flexdll (flexdll-0.27.zip) to build OCaml. Extract it to /mingw/bin. Then, download the latest OCaml source (3.12.1). Patch ocaml with this Unicode patch.


    tar xzvf ocaml-3.12.1.tar.gz
    cd ocaml-3.12.1
    patch -p1 -l < ../ocaml-3.12.1-unicode.patch


    In the config subfolder, copy Makefile.mingw to Makefile.


    cp config/m-nt.h config/m.h 
    cp config/s-nt.h config/s.h
    cp config/Makefile.mingw config/Makefile


    Begin compiling OCaml.


    make -f Makefile.nt world
    make -f Makefile.nt opt
    make -f Makefile.nt opt.opt
    make -f Makefile.nt install


    Set up OCaml environment variables:


    export CAMLLIB=/mingw/lib
    export OCAMLLIB=/mingw/lib
    export CAMLP4LIB=/mingw/lib/camlp4


  10. Build MLDonkey

    Get the MLDonkey source, then unpack and configure it.


    tar xjvf mldonkey-3.1.0.tar.bz2
    cd mldonkey-3.1.0
    ./configure --build=i686-w64-mingw32 --prefix=/mingw --disable-fasttrack


    To link with the static GD library, append -DNONDLL to the CPPFLAG line of config/Makefile.config


    CPPFLAGS=-I/mingw/include -DNONDLL


    Start compilation.


    export OCAML_SRC=~/ocaml-3.12.1
    cp -iv /mingw/lib/stublibs/dllunix.dll .
    make depend
    make mlnet.static
    strip mlnet.static
    mv mlnet.static mlnet.exe

    If the final linking stage fails, here is the command I used to produce mlnet.exe:


    g++ -g0 -O3 -o mlnet.exe -Wl,--subsystem,windows -L/lib/gcc/i686-w64-mingw32/4.5.3 -L/mingw/lib /tmp/camlstartup00193d.s build/flexdll_mingw.o /mingw/lib/std_exit.o src/daemon/common/commonMain.o build/driver.a build/core.a build/client.a build/common.a build/magic.a build/bitstring.a build/cdk.a build/extlib.a /mingw/lib/nums.a /mingw/lib/str.a /mingw/lib/unix.a /mingw/lib/bigarray.a /mingw/lib/stdlib.a src/utils/cdk/gdstubs.o src/networks/direct_connect/che3_c.o src/utils/lib/CryptoPP.o src/utils/lib/CryptoPP_stubs.o src/utils/net/upnp_stubs.o src/daemon/common/commonHasher_c.o src/utils/lib/magiclib_stub.o src/utils/bitstring/bitstring_c.o src/utils/cdk/zlibstubs.o src/utils/cdk/heap_c.o src/config/mingw/os_stubs_c.o src/utils/lib/fst_hash.o src/utils/lib/md4_comp.o src/utils/lib/md4_c.o src/utils/lib/charsetstubs.o src/utils/lib/md5_c.o src/utils/lib/sha1_c.o src/utils/lib/tiger.o src/utils/lib/stubs_c.o -lnums -lcamlstr -lunix -lbigarray -lgdi32 -luser32 -ladvapi32 -limm32 -lshell32 -lole32 resfile.o -lpthread -lmagic -lgd -ljpeg -lfreetype -lpng -lz -lbz2 -lws2_32 -lshlwapi /mingw/lib/libasmrun.a /mingw/lib/libcharset.dll.a /mingw/lib/libiconv.dll.a


    Optonally, compress the executable with upx.

    upx --best --strip-relocs=0 mlnet.exe


  11. Here's my mldonkey builds.


Tuesday, December 20, 2011

To build wget.exe with MinGW

wget is a useful command-line downloader. To build wget for the Windows platform, first install MinGW. Then, compile zlib, openssl and wget in that order. To compile zlib:


make -f win32/Makefile.gcc
cp -iv zlib1.dll /mingw/bin
cp -iv zconf.h zlib.h /mingw/include
cp -iv libz.a /mingw/lib
cp -iv libz.dll.a /mingw/lib


To compile openssl:


./Configure -DHAVE_STRUCT_TIMESPEC -DPTW32_STATIC_LIB -L/mingw/lib -lz -lpthreadGC2 -lws2_32 --prefix=/mingw threads zlib mingw
make
make test
make install


Now, build wget


./configure --prefix=/mingw --enable-threads=win32 --disable-nls --with-ssl=openssl
make
make install

Monday, October 17, 2011

Compiling Zip and Unzip with MinGW

The current version of zip supports higher compression with the bzip2 method. To build zip with bzip2 compression using MinGW, first prepare the bzip2 library:


tar xzvf bzip2-1.0.6.tar.gz
cd bzip2-1.0.6
make
cp bzlib.h /mingw/include/
cp libbz2.a /mingw/lib


Then, get the zip source. Use the LOCAL_ZIP environment variable to configure zip.


export LOCAL_ZIP='-DLARGE_FILE_SUPPORT -DZIP64_SUPPORT -DUNICODE_SUPPORT -DBZIP2_SUPPORT -DALLOW_REGEX


Edit the LIBS line in the file makefile.gcc in the win32 folder to link zip with bzip2 library


LIBS=-luser32 -ladvapi32 -lbz2


Compile zip.


make -f win32/makefile.gcc


You'll find zip.exe in the source folder.


Compiling Unzip with MinGW


Unzip is a command-line extraction tool for .zip archives. In order to be able to unpack bzipped .ZIP archive, I need to compile unzip with bzip2 support. After compiling bzip2 as above, I downloaded unzip60.tar.gz from Info-Zip project at Sourceforge and unpacked it.


tar xzvf unzip60.tar.gz
cd unzip60


I fixed the file win32/Makefile.gcc in the section following "# optional inclusion of bzip2 decompression"


INC_BZ2LIB = -I/mingw/include
LOCFLAGS = -I/mingw/include -DUSE_BZIP2
LD_BZ2LIB = -L/mingw/lib -lbz2
LIBBZIP2 = /mingw/lib/libbz2.a


Then, I compiled Unzip like this:


make -f win32/Makefile.gcc
ls -l *.exe

Three executables unzip.exe, unzipsfx.exe and funzip.exe are created. Copy them to a folder in your path or /bin.


cp -iv *.exe /C/Windows


Usage Examples


To back up a folder:


zip -Z bzip2 -b C:\Windows\Temp -SDurX backup.zip *

Thursday, August 18, 2011

Logging Into Linux Desktop with Xming, Xnest and Putty

I use Xming and Putty to remotely log into my Linux desktop over a secure connection. Since I use xdm for the X11 login screen, I had to set up xdm for remote login. I made sure /etc/X11/xdm/xdm-config had this setting:


DisplayManager.requestPort: 117

I changed /etc/X11/xdm/Xaccess to allow any connection:


echo "*" > /etc/X11/xdm/Xaccess

I installed xnest on the Linux machine.


On Windows, install xming and X11 fonts. Start the Xming server.


Xming.exe :16 -clipboard -multiwindow -nolisten inet6

Then, start putty, enable X11 port forwarding and connect to the Linux box. Once you are logged into the remote terminal, start Xnest:


Xnest :16 -ac -geometry 960x720 -once -query 127.0.0.1

A window will pop up showing your lovely Linux destkop. Now, enjoy your Linux applications on Windows.

Sunday, April 3, 2011

Cloud Storages for Linux

Today the trend is to put your valuable data somewhere on the Internet and access it anywhere. This is a dramatic departure from the past as our trust grows towards Internet companies. More companies are offering cloud storage services, for example, Box.net and Zumodrive. Here I show how to set up Linux to access cloud storages.


Box.net offers 5GB of free online storage for personal use, but each upload must be smaller than 25MB. Zumodrive offers 2GB free space initially, but unlike box.net you can upload any size of files using the ZumoDrive desktop application.


Adding a Box.net folder in KDE Dolphin


  1. Select Network from the Places panel. Then, double-click on Add Network Folder.


  2. Choose the WebFolder (webdav) and click Next.


  3. Enter information for Box.net as follows.


Setting up Zumodrive on Mint KDE edition


  1. Download the Zumodrive package for Ubuntu 8 or later (zumodrive-ubuntu8-i386-0.989.deb).
  2. The Zumodrive package depends on openjdk-6-jre, but Sun's JRE is installed in Mint, so you don't have to install openjdk-6-jre.

    However, you need install libinotifytools0, libgnet2.0-0 and libnautilus-extention1. I used Synaptics to install the missing packages.
  3. Unpack the zumodrive package into the system.

    cd /
    dpkg --extract zumodrive-ubuntu8-i386-0.989.deb .

  4. Copy /usr/share/applications/zumodrive.desktop to your Desktop folder, so you can start Zumodrive by double-clicking the icon on desktop. Optionally, right-click on the icon, choose Properties and make it executable.


  5. Now double-click on the Zumodrive icon. Once you type in your email and password, you can access Zumodrive through the ~/Zumodrive folder.

Wednesday, March 23, 2011

Hacker's Guide To Installing Windows 7

Many people want to try the new Windows 7, but they're not too sure if Windows 7 is worth it. After all, it doesn't make sense to buy a new computer to try Windows 7 and then find out it's another lame bloatware. This guide will help an average joe to download, install and activate Windows 7 with freely available tools.


Hardware Requirements of Windows 7


First, you need to decide if your computer is capable of running Windows 7. According to Microsoft, Windows 7 has the following hardware requirements:


  • 1 GHz or faster 32-bit or 64-bit processor
  • 1 GB RAM (32-bit) or 2 GB RAM (64-bit)
  • 16 GB available hard disk space (32-bit) or 20 GB (64-bit)
  • DVD-ROM drive or DVD burner
  • DirectX 9 graphics card with WDDM 1.0 or better driver


That means Windows 7 can run on most computers available. You may have to buy additional memory or a new video card to be able to run Windows 7. See the Windows 7 Compatibility site.


Next, decide which edition of Windows 7 you want to install on your computer. There are many editions of Windows 7, for example, Home Premium, Professional, Enterprise and Ultimate. For most people, Windows 7 Home Premium is good enough.


Windows 7 Direct Downloads and Bittorrents


It is recommended that you use aria2, Halogenware Retriever or Free Download Manager to download Windows 7 so you can resume a download in the event of connection problems. On the Web, you can download DVD images of Windows 7 from the following locations:


  • Windows 7 Home Premium SP1 (x86 English) X17-24208.iso

    MD5: c5bb99b2f1a9e7a5b4fbc6e3eff70882

    SHA1: 22df3e5a80f8dbf014c2776a01b1cd9f24d83233

    CRC32: 9c5dc931
  • Windows 7 Home Premium SP1 (x64 English) X17-24209.iso

    MD5: 971843a457b6e0db0af61258cbe7256a

    SHA1: b4821f46a171708f5f8f8a0ef48fc16529437961

    CRC32: d236fd70
  • Windows 7 Professional SP1 (x86 English) X17-24280.iso

    MD5: befd4f1e00ec8da2effbd789f4e66fbf

    SHA1: 917a542b0541054bb9c2a06a11a46aed6943856b

    CRC32: 20078d8d
  • Windows 7 Professional SP1 (x64 English) X17-24281.iso

    MD5: 338f3245d68527db47b8a44e55317d0a

    SHA1: 5ed2584110e03f498db4458ba9fafd5a7ef602ed

    CRC32: 74f3cb73
  • Windows 7 Ultimate SP1 (x86 English) X17-24394.iso

    CRC32: C2966895

    MD5: 24F3A45D43D7C532AA3126CC094C61BD

    SHA1 : 92c1ada4ff09c76ec2f1974940624cab7f822f62

    SHA2: BBB5E0BAF3659F6DEC96B50381CBB05C09F066675EE639324B728215D5D47C43
  • Windows 7 Ultimate SP1 (x64 English) X17-24395.iso

    CRC32: 8589EE18

    MD5: 56A26636EC667799F5A7F42F142C772D

    SHA1: 1693b6cb50b90d96fc3c04e4329604feba88cd51

    SHA2: 9A2F3972FBBBB4974255CCCC26CDA9B1A75D9D0179867D6111162AC33F0CB693
  • Windows 7 Home Premium (x86 English) X15-65732.iso

    SHA1: CC9D8220B2179E784D85BF1EA98D2EE2190D534F

    ISO/CRC: 5DF6DBA0
  • Windows 7 Home Premium (x64 English) X15-65733.iso

    SHA1: 336779EA6B65F63E11A609B4D021439C47AB315B

    ISO/CRC: 56D954E4
  • Windows 7 Professional (x86 English) X15-65804.iso

    SHA1: 697FA06554502FB21D30275273B25747299C020D

    ISO/CRC: 578725D1
  • Windows 7 Professional (x64 English) X15-65805.iso

    SHA1: 50127304441A793EE51B3F501289F6599A559E9F

    ISO/CRC: 502C42C1
  • Windows-7-SP1-EN-MSDN-TechNet.torrent


I like using aria2 for download. Get my aria2 win32 build from here. To use aria2c to download Windows 7 Home Premium, open the Command Prompt and type the following command.


aria2c --file-allocation=prealloc http://msft-dnl.digitalrivercontent.net/msvista/pub/X15-65732/X15-65732.iso


To stop the download, press Ctrl+C twice. Later, you can resume download with the command:


aria2c -c http://msft-dnl.digitalrivercontent.net/msvista/pub/X15-65732/X15-65732.iso


After the download has finished, verify the checksums of the download with md5deep or HashCheck shell extension.

This is optional. If you want to create a single All-in-One DVD that can be used to install Home Basic, Home Premium, Professional and Ultimate edition, download and run eicfg_remover. This tool removes ei.cfg from the ISO file.

Then, burn the image to a blank DVD. You need to have a DVD burner and a blank DVD, of course. For free DVD-burning software, you can get ImgBurn, InfraRecorder or CDBurnerXP.


Wednesday, March 2, 2011

Compiling Linux Kernel 2.6.38

Let's compile a Linux kernel. To build a kernel, I installed the following packages:


  • binutils
  • gcc-4.4
  • libglade2-dev for "make gconfig"
  • libqt3-mt-dev or libqt4-dev for "make xconfig"
  • make
  • module-init-tools
  • patch


libglade2-dev is needed to configure the kernel by running “make gconfig”. In addition, I am going to include the following features.


  • unionfs is a union filesystem that allows me to merge several filesystems into a single logical one. It has several uses, such as Live CD's and modifiable read-only filesystem.
  • ndiswrapper allows me to use many network devices by installing native Windows drivers.

I downloaded the kernel source and unpacked it.


tar xjvf linux-2.6.38.tar.bz2
cd linux-2.6.38

Then, I applied the unionfs patch.


gzip -dc ../unionfs-2.5.3_for_2.6.18.8.diff.gz | patch -p1 -l

Then, I configured the kernel with a GTK configuration tool.


cp /boot/config-2.6.31.5 .config
make gconfig


Open Makefile with an editor and define EXTRAVERSION if necessary.


Now let's compile the kernel.


make bzImage
make install
make modules
make modules_install
depmod -e -F /boot/System.map-2.6.38 -m 2.6.38


Set the default root device and ramdisk size for the new kernel.


cd /boot
rdev vmlinuz-2.6.38 1,0
ramsize vmlinuz-2.6.38 4096


Finally, compile ndiswrapper (Patches available here).


tar xzf ndiswrapper-1.55.tar.gz
cd ndiswrapper-1.55
KVERS=2.6.31.6 make uninstall
KVERS=2.6.31.6 make
KVERS=2.6.31.6 make install


Generate modules.* files.


depmod -e -m -F /boot/System.map-2.6.31.6 2.6.31.6

Sunday, January 2, 2011

Building mplayer on Debian Linux

MPlayer is one of my favorite media players. It is used with such frontend as smplayer, gnome-mplayer or MPlayerGUI to provide a good alternative to Windows Media Player and VLC. First, I installed the necessary compiler toolchain.


  • autoconf
  • automake
  • binutils
  • bison
  • cpp
  • g77 or fort77
  • gcc
  • gettext
  • g++
  • libtool
  • make


Next, I installed the necessary development libraries:


  • libasound2-dev
  • libbz2-dev
  • libesd0-dev
  • libfontconfig1-dev
  • libfribidi-dev
  • libjpeg62-dev
  • libncurses5-dev
  • libpng12-dev
  • libxv-dev


Some useful libraries are not included in the Debian distribution, so I had to compile them on my own. They are faac, lame, libdca, live, x264 and xvidcore. First, I built liblzo.


tar xzvf /usr/src/lzo-2.04.tar.gz
cd lzo-2.04/
./configure --prefix /usr
make
make install


Then, I built the giflib.


tar xjvf /usr/src/giflib-4.1.6.tar.bz2
cd giflib-4.1.6/
ls
./configure --build=i586-pc-linux-gnu --prefix=/usr --disable-shared
make
make install


I built cdparanoia.


tar xzvf /usr/src/cdparanoia-III-10.2.src.tgz
cd cdparanoia-III-10.2/
./configure --build=i586-pc-linux-gnu --prefix=/usr --disable-shared
make
make install


I compiled libdca in the following way:


tar xjvf libdca-0.0.5.tar.bz2
cd libdca-0.0.5/
./configure --build=i586-pc-linux-gnu --prefix=/usr --disable-shared
make
make install


I built ogg, vorbis, theora and speex.


./configure --build=i586-pc-linux-gnu --prefix=/usr --disable-shared
make
make install


To compile lame, run:


tar xzvf /usr/src/lame-3.98.4.tar.gz

cd lame-3.98.4/

./configure --build=i586-pc-linux-gnu --prefix=/usr --disable-shared --mandir=/usr/share/man --enable-expopt=full --enable-nasm

make

make install


Unpack live555 source in /usr/lib and compile live555 as follows:


cd /usr/lib/live

./genMakefiles linux

make


To compile x264, do:


tar xjvf /usr/src/x264-snapshot-20110102-2245.tar.bz2

cd x264-snapshot-20110102-2245/

sh configure --host=i586-pc-linux-gnu --prefix=/usr --enable-pic --disable-asm

make

make install


Compile the xvid library as follows:


cd xvidcore/build/generic

./configure --build=i586-pc-linux-gnu --prefix=/usr

make

make install


Finally, you're ready to compile MPlayer. Get the latest snapshot tarball and extract it:


wget ftp://ftp.mplayerhq.hu/MPlayer/releases/mplayer-export-snapshot.tar.bz2

tar xjvf mplayer-export-snapshot.tar.bz2

cd mplayer-export-2009-05-29

CPPFLAGS='-DLIBTWOLAME_STATIC' ./configure --prefix=/usr --enable-runtime-cpudetection --yasm=/usr/bin/yasm --language=all --confdir=/etc/mplayer

make

make install

chmod 4755 /usr/bin/mplayer

About This Blog

KBlog logo This blog seeks to provide a collection of interesting pictures found on the Web. Thanks for visiting the blog and posting your comments.

© Contents by KBlog

© Blogger template by Emporium Digital 2008

Followers

Total Pageviews

Powered By Blogger