Wednesday, October 17, 2012

To Install the Same Set of Packages as Another Debian Machine

I know this is a well-known trick with the Debian package system, but I'm going to sum it up here. Suppose that you want to install the same set of packages on box A as box B. At box B, type the following command to get the list of installed packages.


dpkg --get-selections > select.txt


Then, take select.txt to box A and run on box A:


apt-get update
dpkg --set-selections < select.txt
apt-get -u dselect-upgrade

Tuesday, October 16, 2012

Share your Linux desktop with x11vnc

x11vnc is a pretty useful program that you can use to share your Linux desktop with someone far away. To start x11vnc while using X11 windows, issue the following command:


x11vnc -display :0


This command will work in most cases, assuming there is only one instance of X11 Windows server running. However, the display number could be different. To be sure, type the following command:


xdpyinfo | head


x11vnc will output a lot of information, including the port number it runs on:


The VNC desktop is:      bootcd:2
PORT=5902


Subtracting 5900 from the port number (5902), you'll get the display number (2). Use this number to connect to your desktop remotely. I use gvncviewer.


gvncviewer 192.168.200.83:2


TightVNC viewer on Windows Vista


Administrator To Monitor Someone's Desktop with X11VNC


Let's assume that you are a system administrator with root privilege and want to monitor a user's X11 Windows desktop. You can't just run “x11vnc -display :0” because you are not the user currently using display :0. In that case, you need access to the X11 Windows' xauth file which is located at one of the following locations:


  • /var/lib/gdm
  • /var/lib/kdm
  • /var/lib/xdm/authdir/authfiles
  • /home/USER/.Xauthority


Once you locate the xauth file associated with the user's X11 desktop, you can use x11vnc to monitor his desktop activity.


x11vnc -display :0 -auth /var/lib/gdm/\:0.Xauth


Then, on your desktop as administrator, connect to the user's desktop with a vnc client.


gvncviewer 192.168.200.83:2


x11vnc with SSL


x11vnc supports various connection schemes, including SSL. On Debian and Ubuntu, type the following command to create a SSL certificate for use with x11vnc.


cat /etc/ssl/private/ssl-cert-snakeoil.key /etc/ssl/certs/ssl-cert-snakeoil.pem > /tmp/x11vnc.pem


Then, start x11vnc with -ssl option to run x11vnc in secure mode.


x11vnc -display :0 -auth /var/lib/gdm/\:0.Xauth -ssl /tmp/x11vnc.pem


ssvnc and gvncviewer can be used to connect to x11vnc via SSL connection. The following example command starts x11vnc in anonymous SSL mode that doesn't require X509 exchange.


x11vnc -display :0 -xauth /var/lib/xdm/authdir/authfiles/A\:0-R2x5Db -xkb -nopw -nc_cr -ssl /tmp/x11vnc.pem -vencrypt newdh:nox509:support

Setting Up XDM on Debian/Ubuntu Linux

XDM, short for X Display Manager, is my favorite login manager for its simplicity. Sure, gdm and kdm are visually pleasant, but why do I have to install all the dependencies if xdm provides the same functionality as them? After all, xdm can launch GNOME and KDE for you — you just need to fix your ~/.xsession file. This post will serve as my notes on installation, configuration and customization of xdm.


All configuration of xdm, except for distribution-specific settings, is done by modifying the files in the /etc/X11/xdm directory. For now, I'll just go over what I have in my xdm files.


/etc/X11/xdm/Xaccess


This file is used to tell xdm who can use xdm. Therefore, if you are happy to let anyone access the X-Windows desktop locally or remotely, then you would just put an asterisk (*) in Xaccess as I did.


*


If you are very keen on security, you would put only the following in Xaccess. This only allows local users to have access to xdm.


localhost
127.0.0.1


However, even if Xaccess is set up as above, remote xdm login may still be possible with SSH X11 forwarding.


/etc/X11/xdm/Xresources


Xresources file is used to fine-tune the behavior and appearance of XDM. Here is what I put in my Xresources file:


Xcursor.theme: redglass

xlogin*login.translations: #override \
Ctrl<Key>R: abort-display()\n\
<Key>F1: set-session-argument(failsafe) finish-field()\n\
<Key>Delete: delete-character()\n\
<Key>Left: move-backward-character()\n\
<Key>Right: move-forward-character()\n\
<Key>Home: move-to-begining()\n\
<Key>End: move-to-end()\n\
Ctrl<Key>KP_Enter: set-session-argument(failsafe) finish-field()\n\
<Key>KP_Enter: set-session-argument() finish-field()\n\
Ctrl<Key>Return: set-session-argument(failsafe) finish-field()\n\
<Key>Return: set-session-argument() finish-field()

xlogin*greeting: Welcome to CLIENTHOST
xlogin*namePrompt: Login:\040
xlogin*passwdPrompt: Password:\040
xlogin*fail: Login incorrect

xlogin*greetFace: Serif-21:bold:italic
xlogin*face: Sans-15
xlogin*promptFace: Sans-15:bold
xlogin*failFace: Sans-16:bold

xlogin*geometry: 600x400
xlogin*borderWidth: 1
xlogin*frameWidth: 5
xlogin*innerFramesWidth: 2
xlogin*shdColor: grey30
xlogin*hiColor: grey90
xlogin*background: grey
xlogin*greetColor: Blue3
xlogin*failColor: red
*Foreground: black
*Background: #fffff0

xlogin*logoFileName: /usr/share/X11/xdm/pixmaps/penguin_doll_200x300.xpm
xlogin*useShape: true
xlogin*logoPadding: 10


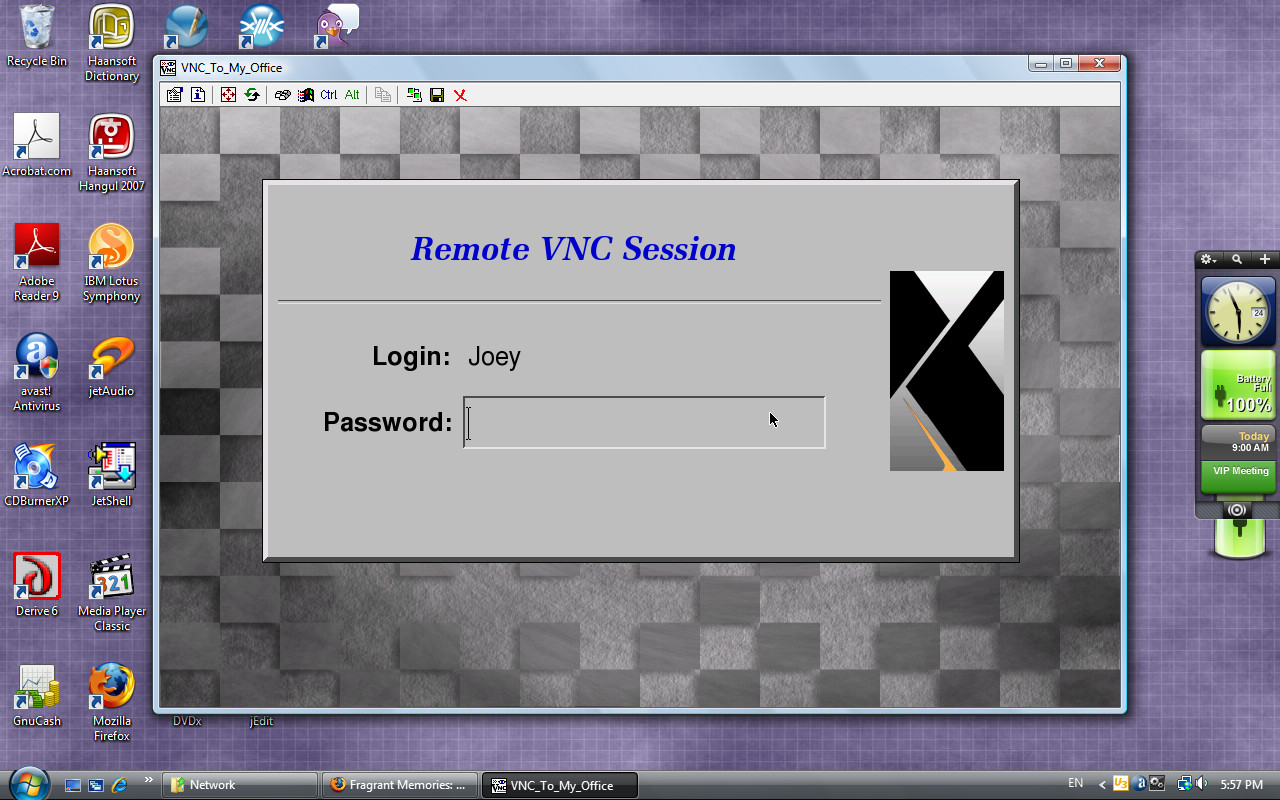
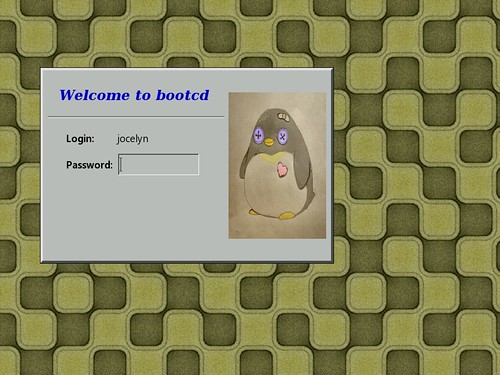
I think the settings are self-explanatory. This is how xdm would look with the above settings. The penguin image was taken from here.


xdm-screenshot

/etc/X11/xdm/Xresources


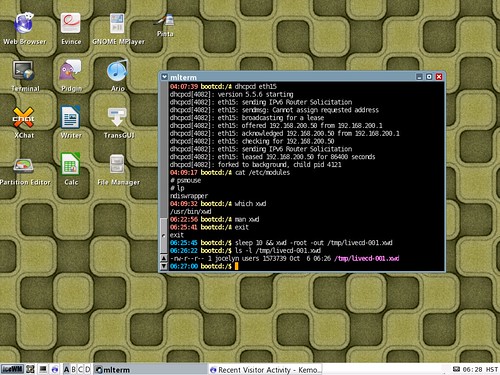
The Xresources file allows you to specify how many X servers to run and their command arguments. In my case, I run Xorg and Xvfb. Xorg is the standard X server, and Xvfb is a server that runs totally in memory without depending on the video hardware. To see what's going on with Xvfb, I use x11vnc and gvncviewer.


# Default X.org server
:0 local /usr/bin/Xorg :0 vt7 -br -dpi 96 -nolisten TCP

:1 local /usr/local/bin/Xvfb :1 -dpi 96 -screen 0 1024x768x16


/etc/X11/xdm/Xsetup


Xsetup allows you to write any command to run when xdm displays the login screen. In my case, I run gm to set up the background image and run x11vnc to remotely access Xvfb via VNC.


#!/bin/sh
#
# This script is run as root before showing login widget.

gm display -window root /usr/share/wallpapers/Board_Tile_Gray.jpg
xkbcomp -dflts -I/usr/share/X11/xkb /etc/X11/xkb/server-0.xkm $DISPLAY

PID_XVFB=$(pidof Xvfb)
PID_X11VNC=$(pidof x11vnc)
if [ -n "$PID_XVFB" -a -z "$PID_X11VNC" ]; then
x11vnc -display :1 -bg -xkb -nopw -nc_cr -forever -listen localhost -auth $(find /var/lib/xdm/authdir/authfiles -name \*:1\*) > /var/log/x11vnc.log 2>&1
fi


/etc/X11/xdm/xdm-config


In xdm-config, there is only one line that I bother to change. This line enables remote xdm logins.


! SECURITY: do not listen for XDMCP or Chooser requests
! Comment out this line if you want to manage X terminals with xdm
DisplayManager.requestPort: 177


/etc/X11/xdm/xdm-options


I think xdm-options is Debian specific. I don't think I made any change in this file.


# configuration options for xdm
# See xdm.options(5) for an explanation of the available options.

no-ignore-nologin
no-restart-on-upgrade
no-start-on-install
use-sessreg


Resetting XDM


There are other files in /etc/X11/xdm directory that you can safely leave as is. After you make any change with the files, have xdm reread the config files.


kill -1 $(pidof xdm)


If you want to force xdm to kill all running sessions and restart, enter the following command.


/etc/init.d/xdm restart


That's all I have to write about xdm for now. In summary, xdm is a simple, yet functional login manager that is easy to set up.

Monday, October 15, 2012

To Create SSL Certificates for Personal / Intranet Use

lock

I'm not a security guru, but I'm writing this as a personal note. Normally, I'll have to pay some company to have my SSL certificate digitally signed for commercial uses. That's because people and businesses won't acknowledge or recognize my SSL certificate in transactions unless it is signed by a reputable company. However, I can create SSL certificates myself for personal / intranet use.


On Debian and Ubuntu systems, after the ssl-cert package is installed, a SSL certificate is automatically created at /etc/ssl/certs/ssl-cert-snakeoil.pem, and the corresponding key is created at /etc/ssl/private/ssl-cert-snakeoil.key. You can just distribute ssl-cert-snakeoil.pem to other peer machines to set up SSL connections. To manually create your own SSL certificates, follow these steps. In this guide, we will use the arbitrary filenames: my-site.key, my-site.crt and my-site.pem.


  1. Generate a public/private key pair:

    openssl genrsa -out my-site.key 1024


  2. Generate a self signed certificate:

    openssl req -new -key my-site.key -x509 -days 3653 -out my-site.crt


  3. Generate the PEM file by just appending the key and certificate files:


    cat my-site.key my-site.crt > my-site.pem


  4. The private key should be kept secret, so change the file permission.


  5. chmod 600 my-site.key my-site.pem


    You can distribute the trust certificate server.crt to your SSL client hosts that will connect securely to the SSL-enabled server. The server may need *.crt files from clients for proper client authentication.


Read Also:


Linux: Transmitting a Bunch of Files using socat

computer

socat is a nifty, versatile tool for establishing a secure data channel between two computers. To install socat on Debian, use apt-get:


apt-get install socat


I was trying to use socat and tar to duplicate the contents of an entire filesystem securely between two computers. In this case, I copied all files in partition /dev/sda5 on box A to partition /dev/sdb6 on box B (IP 192.168.200.83).


Using the SCTP protocol


This method does not involve encryption, so it is relatively simple to follow.


  1. First, I opened a terminal at box B (192.168.200.83) and changed the current directory to /mnt/sdb6 where I will unpack the incoming stream of files.


    cd /mnt/sdb6

    Then, I typed the following command to have socat establish a SCTP connection listening on port 7749. tar would be expecting to receive incoming files.


    socat EXEC:"tar xzf -" SCTP4-LISTEN:7749

  2. Then, I opened a terminal at box A. Here I would transmit a bunch of files to box B (192.168.200.83). I changed directory to /mnt/sda5 containing files to send.


    cd /mnt/sda5

    Then, I typed the following command to transmit all the files in the current directory.


    socat EXEC:"tar czf - ." SCTP4-CONNECT:192.168.200.83:7749


Using the SSL connection


This method involves encrypted connection and requires SSL certicates on both sides of the link. Read this post to learn how to create self-signed SSL certificates if you don't already have one.


  1. Debian and Ubuntu automatically create a local SSL certificate at /etc/ssl/certs/ssl-cert-snakeoil.pem. Both parties of an SSL connection — box A and box B — should exchange each other's ssl-cert-snakeoil.pem in order to have SSL connections between them.


  2. On box B, I typed the following command to run socat in SSL listening mode at port 7749.

    cd /mnt/sdb6
    socat EXEC:"tar xzf -" OPENSSL-LISTEN:7749,reuseaddr,cert=/etc/ssl/certs/ssl-cert-snakeoil.pem,key=/etc/ssl/private/ssl-cert-snakeoil.key,cafile=box-A.pem


  3. On box A, I typed the following command to run socat in SSL mode while running tar to pack all the files and send them through the pipeline.

    cd /mnt/sda5
    socat EXEC:"tar czf - ." OPENSSL:192.168.200.83:7749,cert=/etc/ssl/certs/ssl-cert-snakeoil.pem,key=/etc/ssl/private/ssl-cert-snakeoil.key,cafile=box-B.pem


Thus I have duplicated the whole directory tree from Box A to Box B. Using socat and tar, I was able to mirror a filesystem over the network. As shown above, socat alone can be a good substitute in situations where ssh, scp and/or netcat are needed. socat has many other features I have yet to explore.

Thursday, October 11, 2012

How to Extract Boot Images from Acronis Bootable CD

Acronis Backup and Restore is a great software to purchase for any business that wants to protect and preserve their digital assets from natural or accidental loss. After you purchase Acronis software and deploy it on your computers, you have a chance to create a bootable CD for emergency purpose. The Acronis boot CD will prove useful when you need to restore backups on a compromised or corrupted system.


However, you may want to incorporate Acronis software into your own custom boot CD. The custom CD can be a live Linux CD or live Windows CD. In that case, your ideal CD will have a menu of choices to run Acronis in addition to booting Linux or Windows. To create such a disc, you need to extract boot images from Acronis Boot CD. This post illustrates the steps needed to creat a custom CD containing Acronis software.


  1. Bring your Acronis emergency CD and use the following command to create an ISO file. This assumes that you are using Linux. On Windows, you can use the readom program from my cdrkit build.


    readom dev=/dev/sr0 f=ABR11.5AWUR_en-US.iso speed=8 retries=16 -nocorr -noerror


  2. Acronis uses a special bootloader called BootWiz. To extract the boot image, you need to find the location of area that begins with BOOTWIZ0 string inside the ISO file. This is a hit-or-miss process. hexedit can be used here.


    hexedit ABR11.5AWUR_en-US.iso


  3. In hexedit, press Ctrl+S, then enter 424F4F5457495A30, which translates to BOOTWIZ0. Hit Enter.


    hexedit

  4. Hexedit will find the given string (BOOTWIZ0). Note the address of the line
    (0x1A000). The address (0x1A000) is equivalent to 106496 in decimal, and 208 sectors. After you write down the address, quit Hexedit by pressing Ctrl+C.


    hexedit

  5. Use dd to extract the FAT filesystem image.


    dd if=ABR11.5AWUR_en-US.iso of=abr11.bin skip=208


  6. Use WinImage to convert the image file (abr11.bin) — actually a FAT filesystem image — to a hard disk image format with MBR.


    winimage_export_to_image_mbr

    Normally, you can just put the hard disk image on the CD and boot it using isolinux & memdisk.


    LABEL abr11
    MENU LABEL Acronis Backup & Restore 11
    KERNEL memdisk
    INITRD abr11.bin


  7. Alternatively, you can mount the image file (abr11.bin) and extract only the kernel and initramfs.


    mount -t msdos -o loop,ro abr11.bin /mnt
    cd /mnt
    cp dat*.dat /boot


    The following is an example boot entry for isolinux that starts 64-bit Acronis Backup & Restore.


    LABEL abr11x
    MENU LABEL Acronis Backup & Restore 11 (64-bit)
    KERNEL dat5.dat
    INITRD dat4.dat
    APPEND video=vesa:mtrr vga=0x317 product=bootagent media_for_windows quiet


    The kernel parameters to put as APPEND string can be taken from the efi/boot/bootx64.xml.


Aria2 shell script and batch file

I wrote a BASH shell script and a DOS batch file that can be used to download files using aria2 — Aria2 is a command-line tool for downloading files. The script and the batch file take 2 arguments; the first one is for the bittorrent hash in 40-digit hexadecimal number and the second one is for arbitrary one-word description.


aria2.bat can be used on Windows, and aria2.sh can be used on Linux and *BSD. Make sure that aria2c is in PATH. For example, if you want to download an ISO file for the OpenSUSE DVD, you would type something like:


aria2.bat 198472f5217d843cceb1a4c82233f009ed6608af opensuse-dvd-586


To find the value of a bittorrent hash (that long hex number), you can cut it from a magnet link you find on a Web site — Magnet links allow you to download actual files without first having to download bittorrent files (*.torrent). When you see a magnet sign, right-click on it to display the shortcut menu and select Copy Link Location.


btih-demo1

Then, paste it somewhere, for example, inside the URL address bar. The hash value comes after the btih: string.


btih-demo2

After you find the bittorrent hash, use it as the first argument to the script and make up anything for the second argument, as shown in the example above.


Tuesday, October 9, 2012

isolinux.cfg for a live CD

isolinux is a bootloader included in the syslinux package and is used to boot a CD or DVD. isolinux is one of several popular bootloaders used to create a bootable CD for open-source operating systems, including Linux and FreeDOS. Another bootloader is GRUB, which I rarely use except for booting Windows 7 with BIOS emulation.


To create a bootable CD with isolinux, just copy the file isolinux.bin to a folder that will hold CD contents for ISO mastering. On Debian or Ubuntu, the file is located at the /usr/lib/syslinux folder.


ISOFS contents

A file named isolinux.cfg needs to be created in order to provide a menu or boot entries. A sample isolinux.cfg is shown below. It makes use of vesamenu.c32 which helps display a nice graphical menu with a background picture. Vesamenu.c32 is also located in /usr/lib/syslinux and needs to be copied too.


# isolinux.cfg
# Configuration for ISOLINUX

# Wait for 60 seconds before booting up the default entry.
TIMEOUT 600
F1 help.txt #ff702640

UI vesamenu.c32
MENU RESOLUTION 640 480
MENU BACKGROUND back642.jpg
MENU COLOR border 30;44 #40dfdfdf #00000000 std
MENU COLOR title 1;36;43 #e0fdff49 #804206ef none
MENU COLOR sel 7;37;40 #e0000000 #40ffffff all
MENU COLOR hotsel 1;7;37;40 #e0af0000 #40ffffff all
MENU COLOR disabled 1;30;44 #ffe4de6f #00000000 std
MENU COLOR scrollbar 30;44 #40000000 #e0af0000 std
MENU TITLE Boot Menu
MENU CLEAR

MENU ROWS 14
MENU TABMSGROW 20
MENU CMDLINEROW 20
MENU TIMEOUTROW 22
MENU HELPMSGROW 24
MENU VSHIFT 1

# The default is to boot the first hard drive.
DEFAULT hd0
ONERROR hd1

MENU BEGIN livecd_menu

MENU TITLE Linux Live CD Menu

LABEL livecd_heading
MENU LABEL Boot Linux live CD
MENU DISABLE

LABEL livecd_640x480
MENU LABEL 640x480 screen
MENU INDENT 1
KERNEL 360.lnx
INITRD initram.lzm
APPEND root=/dev/sr0 edd=off vmode=640x480

LABEL livecd_800x600
MENU LABEL 800x600 screen
MENU INDENT 1
KERNEL 360.lnx
INITRD initram.lzm
APPEND root=/dev/sr0 edd=off vmode=800x600

LABEL livecd_1024x768
MENU LABEL 1024x768 screen
MENU INDENT 1
KERNEL 360.lnx
INITRD initram.lzm
APPEND root=/dev/sr0 edd=off vmode=1024x768

MENU SEPARATOR

LABEL livecd_console_heading
MENU LABEL Boot Linux live CD into text console
MENU DISABLE

LABEL livecd_console
MENU LABEL text-mode console
MENU INDENT 1
KERNEL 360.lnx
INITRD initram.lzm
APPEND root=/dev/sr0 nox

LABEL livecd_console_old
MENU LABEL text-mode console for an old computer
MENU INDENT 1
KERNEL 360.lnx
INITRD initram.lzm
APPEND root=/dev/sr0 acpi=off irqpoll nox

MENU SEPARATOR

LABEL exit0
MENU LABEL Return to the main menu.
MENU EXIT

MENU END

MENU BEGIN cdram_menu

MENU TITLE Linux on RAMdisk Menu

LABEL cdram_heading
MENU LABEL Boot Linux on RAMdisk
MENU DISABLE

LABEL cdram_640x480
MENU LABEL 640x480 screen
MENU INDENT 1
KERNEL 360.lnx
INITRD initram.lzm
APPEND boot=cdrom root=/dev/ram ramdisk_size=573440 edd=off vmode=640x480

LABEL cdram_800x600
MENU LABEL 800x600 screen
MENU INDENT 1
KERNEL 360.lnx
INITRD initram.lzm
APPEND boot=cdrom root=/dev/ram ramdisk_size=573440 edd=off vmode=800x600

LABEL cdram_1024x768
MENU LABEL 1024x768 screen
MENU INDENT 1
KERNEL 360.lnx
INITRD initram.lzm
APPEND boot=cdrom root=/dev/ram ramdisk_size=573440 edd=off vmode=1024x768

MENU SEPARATOR

LABEL cdram_console_heading
MENU LABEL Boot Linux RAMdisk into text console
MENU DISABLE

LABEL cdram_console
MENU LABEL text-mode console
MENU INDENT 1
KERNEL 360.lnx
INITRD initram.lzm
APPEND boot=cdrom root=/dev/ram ramdisk_size=573440 nox

LABEL cdram_console_old
MENU LABEL text-mode console for an old computer
MENU INDENT 1
KERNEL 360.lnx
INITRD initram.lzm
APPEND boot=cdrom root=/dev/ram ramdisk_size=573440 acpi=off irqpoll nox

MENU SEPARATOR

LABEL exit1
MENU LABEL Return to the main menu.
MENU EXIT

MENU END

LABEL hd0
MENU LABEL First Hard Drive
LOCALBOOT 0x80

LABEL hd1
MENU LABEL Second Hard Drive
KERNEL chain.c32
APPEND hd1 swap

MENU BEGIN hd0_menu

MENU TITLE Partition in First Hard Drive

LABEL hd0_part1
MENU LABEL 1st partition
KERNEL chain.c32
APPEND hd0 1

LABEL hd0_part2
MENU LABEL 2nd partition
KERNEL chain.c32
APPEND hd0 2

LABEL hd0_part3
MENU LABEL 3rd partition
KERNEL chain.c32
APPEND hd0 3

LABEL hd0_part4
MENU LABEL 4th partition
KERNEL chain.c32
APPEND hd0 4

LABEL hd0_part5
MENU LABEL 5th partition
KERNEL chain.c32
APPEND hd0 5

LABEL hd0_part6
MENU LABEL 6th partition
KERNEL chain.c32
APPEND hd0 6

LABEL hd0_part7
MENU LABEL 7th partition
KERNEL chain.c32
APPEND hd0 7

LABEL hd0_part8
MENU LABEL 8th partition
KERNEL chain.c32
APPEND hd0 8

LABEL hd0_part9
MENU LABEL 9th partition
KERNEL chain.c32
APPEND hd0 9

LABEL hd0_part10
MENU LABEL 10th partition
KERNEL chain.c32
APPEND hd0 10

MENU SEPARATOR

LABEL exit3
MENU LABEL Return to the main menu
MENU EXIT

MENU END

LABEL fd0
MENU LABEL Floppy Drive
LOCALBOOT 0x00

LABEL next
MENU LABEL Next in boot sequence
LOCALBOOT -1

LABEL memtest
MENU LABEL Test your computer memory
LINUX memtest.bin
TEXT HELP
Run Memtest86 to test your computer memory
ENDTEXT

LABEL help
MENU LABEL Help
MENU HELP help.txt #ff702640


isolinux boot menu

The example above is one that I use for my live CD, so some settings are specific to my situation. Thus, KERNEL and APPEND settings may have to be adapted for other users. However, all the keywords shown above is standard and acceptable.


Monday, October 8, 2012

Linux: Building X.org Kdrive Server Xfbdev on Debian Wheezy

Kdrive is a minimal X11 server that runs as a single executable with little dependencies. I use Kdrive for my Web-only/Rescue Linux systems. Before compiling Kdrive, I installed the following packages on my box running Debian Sid — which will be eventually rolled into Wheezy release:


  • bison

  • g++-4.7

  • libexpat1-dev

  • libpciaccess-dev

  • libpixman-1-dev

  • libssl-dev

  • libudev-dev
  • libxdamage-dev

  • libxfont-dev

  • libxi-dev

  • libxkbfile-dev

  • libxmu-dev

  • libxxf86vm-dev

  • make

  • pkg-config

  • x11proto-bigreqs-dev

  • x11proto-composite-dev

  • x11proto-randr-dev

  • x11proto-render-dev

  • x11proto-resource-dev

  • x11proto-scrnsaver-dev

  • x11proto-video-dev

  • x11proto-xcmisc-dev

  • x11proto-xf86dga-dev

  • x11proto-xinerama-dev

  • xkb-data


Installing X Protocol Headers


The current RandR protocol headers from Debian didn't meet the required version, so I had to download the latest one from freedesktop.org. I installed randrproto like this.


tar xjvf randrproto-1.4.0.tar.bz2
cd randrproto-1.4.0
./configure --prefix=/usr
make install


Compiling Xfbdev


I got the latest X.org release from freedesktop.org. The following commands will build Xfbdev:


tar xjf xorg-server_1.13.0.tar.bz2

cd xorg-server-1.13.0/

./configure --prefix=/usr --disable-xorg --enable-kdrive --enable-kdrive-evdev --enable-config-udev --disable-aiglx --disable-glx --disable-dri --disable-dri2 --disable-drm --disable-record --with-xkb-path=/usr/share/X11/xkb --with-xkb-output=/var/lib/xkb --with-xkb-bin-directory=/usr/bin --with-default-xkb-rules=xorg --with-default-xkb-model=pc105 --with-default-xkb-layout=us

make

make install


Installed Files


The following files are installed after successfully building a Kdrive server.


/usr/bin/Xfbdev

/usr/bin/Xnest

/usr/bin/Xvfb

/usr/lib/xorg/protocol.txt

/usr/share/man/man1/Xnest.1

/usr/share/man/man1/Xserver.1

/usr/share/man/man1/Xvfb.1

/var/lib/xkb/README.compiled


To Use Xfbdev


An executable file Xfbdev will be created in /usr/bin. To be able to use the Xfbdev server, framebuffer video must be enabled either in the kernel or as a module. If CONFIG_FB_VESA option was enabled in the kernel, you can use the syslinux bootloader in the following way to boot Linux into a framebuffer video mode:


LABEL minimal
KERNEL vmlinuz-2.6.31.5
INITRD initramfs.lzma
APPEND vga=0x314 video=vesafb:mtrr


Once the framebuffer video has been activated, Xfbdev can be started in the following way:


Xfbdev :0 vt7 dpms -ac -br +bs -dpi 96 -mouse evdev,5,device=/dev/input/event2 -2button -keybd evdev,,device=/dev/input/event3 -fp /usr/local/share/fonts,/usr/share/fonts/X11/Type1,/usr/share/fonts/truetype/ttf-dejavu -nolisten TCP


Download my X.org build 1.13.0


Download

Here you can obtain my compiled binaries Xfbdev, Xnest and Xvfb:


Also Read:


Saturday, October 6, 2012

My Live CD based on Debian Linux Sid

I created a Live CD from my Debian Linux installation. It is based on the unstable version (Sid). However, the live CD still lacks the capability to automatically configure X-Windows and the network, and uses IceWM for minimalist desktop. It can be downloaded from Google Drive. This Live CD has many uses, such as:


  • To troubleshoot and fix computer problems
  • To create backups and restore them
  • To partition a hard drive before installing Windows or Linux
  • To set up GRUB bootloader or enter boot commands
  • To install Debian, Ubuntu or Fedora
  • To access a Windows partition when it is unbootable
  • To survey and diagnose wireless and wired networks
  • To enjoy the Internet with the Web, IM, IRC and VoIP
  • To run a simple FTP or HTTP server
  • To participate in peer-to-peer networks
  • To do basic word processing and spreadsheet
  • To listen to music or watch movies
  • To rip CD's and DVD's


livecd-001

The snapshot above shows idesk icons on the desktop. Idesk is a neat application that displays icons on the desktop for you to quickly launch. Currently, I use IceWM instead of GNOME or KDE desktop to save space on the CD. So idesk is used to provide desktop icons for IceWM.


livecd-002

The snapshot above shows mlterm running. mlterm is my favorite terminal application. It allows me to use many languages.


livecd-003

Gparted is a cool application to have on a live CD. It lets you divide the hard drive into many partitions so you can run multiple operating systems.


livecd-004

IceWeasel is rebranded Firefox from Debian. Sorry, Chrome is not included.


livecd-005

LibreOffice is a fork of OpenOffice.org suite. I use it to create documents or read Microsoft Office documents.


Specifying the locale at boot time


To see your own language with the live CD, select an entry from the menu, click Tab and append LANG= option to the command line. For example, if you speak French, append LANG=fr_FR.UTF-8.

About This Blog

KBlog logo This blog seeks to provide a collection of interesting pictures found on the Web. Thanks for visiting the blog and posting your comments.

© Contents by KBlog

© Blogger template by Emporium Digital 2008

Followers

Total Pageviews

Powered By Blogger