Tuesday, March 23, 2010

Using Icedax and LAME to Rip Music CD

This short guide will help you rip a CD with a few command-line tools. Download the following files and put them in a folder, such as C:\WINDOWS.


Insert your music CD into the CD-ROM drive and open a command prompt (cmd.exe). First, run the following command to find your CD-ROM drive.


icedax -scanbus

The following command will display the contents of your CD:


icedax dev='D:' cddb=1 -J

The following command will save the second track as track2.wav:


icedax dev='D:' cddb=1 track=2 track2.wav

The following command will save each track as track##.wav:


for %i in (1 2 3 4 5 6 7 8 9 10) do icedax dev='D:' cddb=1 track=%i track%i.wav

For brief help on icedax command, type:


icedax -h


Using LAME to encode MP3 from .WAV files


LAME is a free MP3 encoder. I've written how to compile LAME in a previous post. The numerous options of LAME can be confusing to new users. After reading the output of lame --help, lame --preset help and lame --longhelp, I decided to go with one of the following presets and the -h option:


  • fm/radio/tape => 112kbps
  • hifi => 160kbps
  • cd => 192kbps
  • studio => 256kbps

The following is options related to ID3 tagging:


  ID3 tag options:
--tt <title> audio/song title (max 30 chars for version 1 tag)
--ta <artist> audio/song artist (max 30 chars for version 1 tag)
--tl <album> audio/song album (max 30 chars for version 1 tag)
--ty <year> audio/song year of issue (1 to 9999)
--tc <comment> user-defined text (max 30 chars for v1 tag, 28 for v1.1)
--tn <track[/total]> audio/song track number and (optionally) the total
number of tracks on the original recording. (track
and total each 1 to 255. just the track number
creates v1.1 tag, providing a total forces v2.0).
--tg <genre> audio/song genre (name or number in list)

Here's an example LAME command using my favorite preset hifi:


LAME --preset hifi -h --tt "House Party Remix" track3.wav PartyRemix.mp3

This converts track3.wav to PartyRemix.mp3 using ABR 160kbps hifi encoding.

Monday, March 22, 2010

Free Command-Line Audio Encoders (for Windows)

Here you can download free, open-source audio encoders for MP3, OGG and AAC music formats. I compiled LAME and Ogg Vorbis tools with MinGW whereas FAAC was compiled by someone (faac-1.28.7z).


Install MPlayer, Mencoder, MP4Box and Mkvmerge


Download my package of Windows executables, including mencoder and mp4box here.


I built it using MinGW. The package contains the following programs.


  • faac.exe
  • faad.exe
  • lame.exe
  • mencoder.exe
  • MP4Box.exe
  • mpcenc.exe
  • mplayer.exe
  • normalize.exe
  • oggdec.exe
  • oggenc.exe
  • ogginfo.exe
  • speexdec.exe
  • speexenc.exe
  • twolame.exe
  • vorbiscomment.exe
  • x264.exe

It is recommended that you unpack the package into C:\Program Files. If MPlayer and Mencoder were installed in C:\Program Files\MPlayer, start Command Prompt and set PATH to include the MPlayer folder:


PATH "C:\Program Files\MPlayer\bin";%PATH%

Mkvmerge is part of Mkvtoolnix that can be obtained from http://www.bunkus.org/videotools/mkvtoolnix/.


Related Links


Sunday, March 14, 2010

MinGW와 MSYS 설치하기

윈도우처럼 오픈소스가 아닌 운영체제를 사용하면 컴파일할 필요를 별로 느끼지 않는다. 하지만, 리눅스를 쓰다 보면 커널 및 여러 쓸모있는 프로그램을 컴파일하게 되고 자연히 컴파일하는 버릇을 가지게 된다. 리눅스에서 쓰던 유용한 프로그램들을 윈도우에서도 쓸 수 있으면 얼마나 좋을까. 다행히 윈도우에서도 리눅스 프로그램을 포팅할 수 있도록 도와 주는 GCC 컴파일러를 제공하는 MinGW 프로젝트가 있다. 물론, 윈도우 전용 프로그램도 맘껏 만들 수 있는, 아주 쓸만한 대체적 개발 환경이다. 그럼, 이제 MinGW를 윈도우에 설치해 보자.


참고: Windows Vista 또는 Windows 7 환경에서는 파일 시스템에 대한 사용자 권한 제한 때문에 MinGW 사용시 컴파일 에러 같은 문제가 일어날 수 있다. 이러한 경우 다음과 같이 여러 해결 방법이 있다.

  • 자신의 사용자 폴더(C:\Users\Name) 또는 데스크탑(C:\Users\Public\Desktop)에 MinGW와 MSYS를 설치한다.
  • FAT 파티션이나 USB 메모리에 MinGW를 설치한다.
  • C:\MinGW에 설치했을 경우 MSYS를 실행할 때 MSYS (rxvt) 아이콘을 오른쪽 마우스 버튼으로 클릭하여 관리자 권한으로 실행한다.
  • USB 메모리에 PortableApps 플랫폼을 설치한 다음 MinGW PortableApp 받아서 설치하면 MinGW 설치가 쉽게 된다. 이렇게 하면 번거롭게 아래 설명을 따르지 않아도 된다.
  • Safe mode로 Windows를 시작한다.


  1. MinGW 설치에는 다음 3 가지 설치 프로그램이 필요하다. 모두 받아서 차례대로 설치하자.


  2. 먼저 MinGW 자동 설치자(MinGW-5.1.6.exe)를 실행한다. 그러면, Download and install 또는 Download only 둘 중 선택하라고 한다. Download and install 즉, 다운로드 후 설치를 선택한다.


    MinGW installer asks download only?

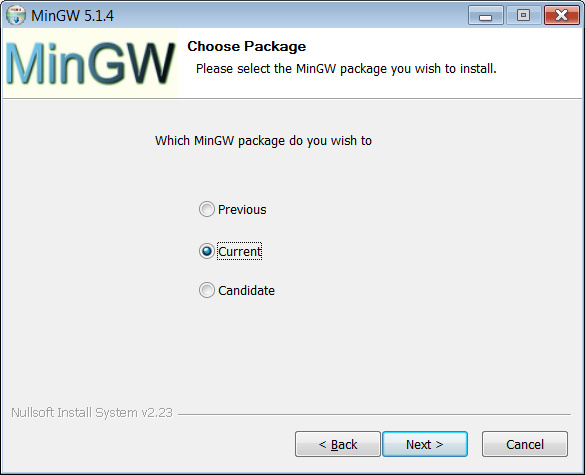
    다음은 MinGW 릴리스를 선택하는 질문인데 Current를 선택한다.


    MinGW installer asks you to choose package

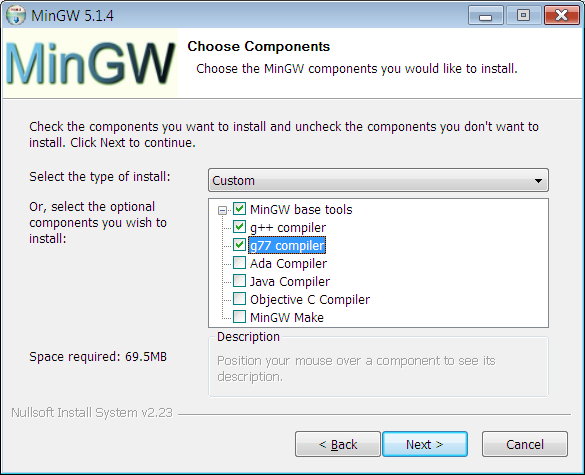
    다음은 MinGW 설치 요소를 선택한다. MinGW base tools, g++ compilerg77 compiler를 선택하기를 권장한다. 나중에 MSYS를 설치하기 때문에 아직은 MinGW make를 선택하지 않는다.


    Select the MinGW components to install

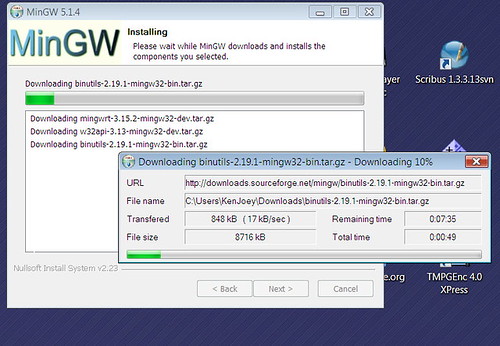
    다음은 설치 폴더를 결정한다. Windows Vista 및 Windows 7 사용자는 기본값인 C:\MinGW 대신 C:\Users\Public\Desktop\MinGW 폴더에 설치하기를 권한다. MinGW는 공백이 포함된 경로와 문제가 있으므로, "Program Files" 또는 "My Documents" 같은 폴더에 설치하지 않는 게 좋다. MinGW 설치 프로그램이 MinGW 요소를 스스로 받아서 설치한다.


    MinGW installer downloading components

  3. MinGW 설치가 끝나면, MSYS-1.0.11.exe를 실행해 MSYS를 설치한다.


    MinGW Destination Directory

    MinGW가 설치된 경로를 묻는 질문이 나오면, 실제로 MinGW가 설치된 경로(기본값 C:/MinGW 또는 C:/Users/Public/Desktop/MinGW)를 입력한다.


    MSYS asks MinGW path

    MSYS가 성공적으로 설치되면, fstab 파일(C:/MinGW/1.0/etc/fstab 혹은 C:/Users/Public/Desktop/MinGW/1.0/etc/fstab)을 텍스트 에디터(notepad.exe)로 열어 내용을 확인한다. 다음과 같이 /mingw 에 대한 실제 디렉토리 매핑이 올바로 되어 있어야 한다.


    C:/MinGW /mingw

    시작 프로그램 메뉴에서 MSYS (rxvt) 아이콘을 더블클릭하여 MSYS를 테스트해 본다. 익숙한 리눅스 명령어를 입력할 수 있는 터미널 창이 나타난다. 다음은 GCC 컴파일러의 버전을 알아보는 명령어인데 현재 3.4.5란 결과가 나올 것이다.


    $ gcc --version
    gcc.exe (GCC) 3.4.5 (mingw-vista special r3)
    Copyright (C) 2004 Free Software Foundation, Inc.
    This is free software; see the source for copying conditions. There is NO
    warranty; not even for MERCHANTABILITY or FITNESS FOR A PARTICULAR PURPOSE.


  4. 다음은 MinGW 개발 도구 모음(msysDTK-1.0.1.exe)을 설치한다. MSYS가 설치된 폴더(C:\MinGW\1.0 혹은 C:\Users\Public\Desktop\MinGW\1.0)에 설치하도록 한다. cvs, perl, ssh 같이 개발에 유용한 도구가 설치될 것이다.


    perl --version
    ssh --version


  5. 그 밖에 MinGW 프로젝트에서 여러 패키지를 받아서 추가적으로 설치한 수 있다. 예를 들어 mingw-utils 받아서 설치할 수 있다.

    cd /mingw
    tar xzvf mingw-utils-0.3.tar.gz

    다음 몇 가지 프로그램도 유용하다.


  6. MinGW 설치 폴더에 쓰기 권한이 없을 경우, 혹은 사용자 이름이 한글일 경우엔 환경변수 HOME을 정해 주는 것이 좋다. 자신의 홈 디렉토리를 따로 설정해 주는 것이다.

    Set your own HOME variable

  7. 마지막으로, 홈 폴더에 .profile 이름의 텍스트 파일을 만들어 컴파일 환경을 설정할 수 있다. 다음은 예제 .profile 내용이다.

    CC='/mingw/bin/gcc.exe '
    CFLAGS='-march=pentium2 -mtune=i586 -mthreads -O2 -g -fomit-frame-pointer -mms-bitfields -pipe '
    CPPFLAGS='-I/mingw/include -DWIN32 -DMINGW32 '
    CXXFLAGS="${CFLAGS}"
    LDFLAGS='-L/mingw/lib -Wl,--enable-auto-image-base -Wl,--enable-auto-import -Wl,--enable-runtime-pseudo-reloc '
    PKG_CONFIG_PATH=/mingw/lib/pkgconfig
    export CC CFLAGS CPPFLAGS CXXFLAGS LDFLAGS PKG_CONFIG_PATH

    CFLAGS와 LDFLAGS를 각자의 취향에 맞게 고쳐서 사용하면 좋다. -march= 옵션으로 자신의 CPU에 최적화한 코드를 만들 수 있는데, i586, pentium-mmx, i686, pentium2, pentium3, pentium-m, pentium4, prescott, k6-2, athlon, athlon-4 따위에서 -march= 값을 고를 수 있다(자세한 정보).


    CFLAGS='-march=pentium3 -mthreads -O2 -fomit-frame-pointer -mms-bitfields -pipe '
    export CFLAGS

Anna Karenina (Russian Novel)

I created an EPUB book containing Leo Tolstory's Anna Karenina in its original Russian language. It is not yet complete. Comments are welcome.


Все счастливые семьи похожи друг на друга, каждая несчастливая семья несчастлива по-своему.

Все смешалось в доме Облонских. Жена узнала, что муж был в связи с бывшею в их доме француженкою-гувернанткой, и объявила мужу, что не может жить с ним в одном доме. Положение это продолжалось уже третий день и мучительно чувствовалось и самими супругами, и всеми членами семьи, и домочадцами. Все члены семьи и домочадцы чувствовали, что нет смысла в их сожительстве и что на каждом постоялом дворе случайно сошедшиеся люди более связаны между собой, чем они, члены семьи и домочадцы Облонских. Жена не выходила из своих комнат, мужа третий день не было дома. Дети бегали по всему дому, как потерянные; англичанка поссорилась с экономкой и написала записку приятельнице, прося приискать ей новое место; повар ушел еще вчера со двора, во время обеда; черная кухарка и кучер просили расчета.

Korean short story: Death of a Prostitute

Death of a Prostitute is a Korean short story about a young prostitute found dead on a street. The ebook is written in Korean and meant for testing Korean on a digital reader supporting EPUB format.


Vietnamese Novel 'Thoi Xa Vang'

Thoi Xa Vang is a Vietnamese novel in EPUB format. It will work with Adobe Digital Editions, Nook and Sony digital reader.


Embedding Russian/Cyrillic/Unicode Fonts in EPUB books

I'd like to read Russian literature in its original language. So I downloaded Leo Tolstoy's Anna Karenina and put it in my Nook.


  1. The original format of the book was a Word document. I had to save it as text file and convert its character set from Windows Cyrillic (CP1251) to UTF-8 using Iconv.

    iconv -f CP1251 -t UTF-8 annakarenina.txt > annakarenina-u.txt


  2. I opened the text file with Sigil, formatted it and saved it as EPUB file.

  3. Put Unicode fonts in the EPUB file that have a cyrillic range. You can do so with 7-zip. I recommend Book Antiqua, MinionPro or DejaVu Serif.

    • antquab.ttf
    • antquabi.ttf
    • antquai.ttf
    • bkant.ttf


  4. Edit content.opf so that it has references to the fonts:

    <item id="font.bold" href="fonts/antquab.ttf" media-type="application/x-font-truetype"/>

    <item id="font.bolditalic" href="fonts/antquabi.ttf" media-type="application/x-font-truetype"/>

    <item id="font.italic" href="fonts/antquai.ttf" media-type="application/x-font-truetype"/>

    <item id="font.regular" href="fonts/bkant.ttf" media-type="application/x-font-truetype"/>

  5. Edit the stylesheet.

    @font-face {
    font-family: "Book Antiqua";
    font-weight: normal;
    font-style: normal;
    src: url(../fonts/bkant.ttf);
    }
    @font-face {
    font-family: "Book Antiqua";
    font-weight: normal;
    font-style: italic;
    src: url(../fonts/antquai.ttf);
    }
    @font-face {
    font-family: "Book Antiqua";
    font-weight: bold;
    font-style: normal;
    src: url(../fonts/antquab.ttf);
    }
    @font-face {
    font-family: "Book Antiqua";
    font-weight: bold;
    font-style: italic;
    src: url(../fonts/antquabi.ttf);
    }
    a {
    color: inherit;
    text-decoration: inherit;
    }
    em, i {
    font-family: "Book Antiqua", serif;
    font-weight: normal;
    font-style: italic;
    }
    strong, b, h1, h2, h3, h4, h5 {
    font-family: "Book Antiqua", serif;
    font-weight: bold;
    font-style: normal;
    }
    p {
    text-indent: 2em;
    margin-top: 0pt;
    margin-bottom: 0pt;
    }
    body {
    font-family: "Book Antiqua", serif;
    margin-left: 5pt;
    margin-right: 5pt;
    text-align: justify;
    }
    .sgc-1 {text-align: center}
    .sgc-2 {text-align: right}


To see how a Russian ebook might look on your Nook or any other reader, download and try my ebook Anna Karerina.

Saturday, March 13, 2010

Windows 7 Installation

I installed the following programs on my Windows 7 machine.


  • Adobe Flash Player
  • Adobe Reader 10.0
  • Avast Antivirus 5
  • CDBurnerXP or ImgBurn
  • Google Apps or Thinkfree
  • Google Chrome
  • IBM Lotus Symphony
  • iTunes
  • Java
  • Microsoft Office 2010
  • NVIDIA Driver
  • QuickTime
  • RealPlayer
  • Skype
  • Windows Live Essentials
  • Zimbra
  • Zumodrive

Creating Korean eBooks in EPUB format

As far as I know, there aren't a lot of Korean ebooks in EPUB format. However, if you have a Korean literature of any kind, you can create an EPUB file for viewing on a digital reader. Assuming that you have a Korean text file in KSC5601 or UHC character set, you should convert your text file into Unicode encoding. You can do so with iconv.


iconv -f UHC -t UTF-8 oldtext.txt > newtext.txt

Open the new Unicode-encoded text in Sigil, edit it and save it as an EPUB file. Now you should add Korean fonts into your EPUB file. I recommend the following fonts.


  • H2GTRM.TTF
  • H2GTRB.TTF

Then, edit content.opf in your EPUB file so that the manifest section contains the following:


<item id="h2gtrm.ttf" href="fonts/h2gtrm.ttf" media-type="application/x-font-truetype"/>
<item id="h2gtrb.ttf" href="fonts/h2gtrb.ttf" media-type="application/x-font-truetype"/>

Start Sigil again and open your EPUB file. Select the dual editing mode and insert the following CSS definitions into the HTML header.


  @font-face {
font-family: HYGothic-Medium;
font-weight: normal;
font-style: normal;
src: url(../fonts/h2gtrm.ttf);
}
@font-face {
font-family: HYGothic-Bold;
font-weight: bold;
font-style: normal;
src: url(../fonts/h2gtrb.ttf);
}
a {
color: inherit;
text-decoration: inherit;
}
em, i {
font-family: HYGothic-Medium, sans-serif;
font-weight: normal;
font-style: italic;
text-decoration: underline;
}
strong, b, h1, h2, h3, h4, h5, h6 {
font-family: HYGothic-Bold, sans-serif;
font-weight: bold;
font-style: normal;
}
body {
font-family: HYGothic-Medium, sans-serif;
margin-left: 5pt;
margin-right: 5pt;
text-align: justify;
}

Test your ebook with Adobe Digital Editions. It should display Korean correctly.

Wednesday, March 10, 2010

How to embed Unicode fonts in EPUB ebooks

I own a Barnes and Noble's Nook and recently had a trouble reading a Vietnamese novel on Nook. But I resolved the issue by hacking the EPUB ebook as explained below:


  1. Get the Unicode fonts that you want for your ebook. The following fonts come with Adobe Reader and cover enough Unicode ranges.
    • MyriadPro-Bold.otf
    • MyriadPro-It.otf
    • MyriadPro-Regular.otf

    With 7-zip, put the Unicode fonts in your ebook.
  2. Extract content.opf from your ebook and insert the following lines in the manifest section:
    <item href="MyriadPro-Bold.otf" id="embedded.font.bold" media-type="font/opentype"/>

    <item href="MyriadPro-It.otf" id="embedded.font.italic" media-type="font/opentype"/>

    <item href="MyriadPro-Regular.otf" id="embedded.font.regular" media-type="font/opentype"/>
    Put content.opt back into the ebook file.
  3. Extract stylesheet.css from the ebook and append the following contents:
    @font-face {
    font-family: "Myriad Pro";
    font-weight: normal;
    font-style: normal;
    src: url(MyriadPro-Regular.otf);
    }
    @font-face {
    font-family: "Myriad Pro";
    font-weight: normal;
    font-style: italic;
    src: url(MyriadPro-It.otf);
    }
    @font-face {
    font-family: "Myriad Pro";
    font-weight: bold;
    font-style: normal;
    src: url(MyriadPro-Bold.otf);
    }
    a {
    color: inherit;
    text-decoration: inherit;
    }
    em, i {
    font-family: "Myriad Pro", sans-serif;
    font-weight: normal;
    font-style: italic;
    }
    strong, b, h1, h2, h3, h4, h5 {
    font-family: "Myriad Pro", sans-serif;
    font-weight: bold;
    font-style: normal;
    }
    body {
    font-family: "Myriad Pro", sans-serif;
    margin-left: 5pt;
    margin-right: 5pt;
    text-align: justify;
    }
    p {
    text-indent: 2em;
    margin-top: 0pt;
    margin-bottom: 0pt;
    }
    Put stylesheet back in your ebook.
  4. Try and read your ebook with Adobe Digital Editions or your favorite ebook reader.

About This Blog

KBlog logo This blog seeks to provide a collection of interesting pictures found on the Web. Thanks for visiting the blog and posting your comments.

© Contents by KBlog

© Blogger template by Emporium Digital 2008

Followers

Total Pageviews

Powered By Blogger