To guard against disasterous hard disk failure or data loss, regular backup is very important. For Windows users, there's Norton Ghost which helps back up valuable data and settings in your hard disk. But for thrifty and savvy users, there's a nifty Linux tool called partimage. It's a simple console program but does its job great.
This tutorial guides you in backing up hard disk partitions in Linux. Let's assume you want to back up your Windows partition to a USB drive using partimage. If you are a Linux user, install partimage.
Otherwise, you can download and burn a System Rescue CD and boot with it. Connect your USB hard drive to your computer and mount it. If your USB drive has a FAT32 partition on /dev/sdb1, then the following command will mount it on /mnt:
mount -t vfat -o gid=100,dmask=2,fmask=113,shortname=winnt /dev/sdb1 /mnt
Make a folder called Backup and change to it:
cd /mnt
mkdir Backup
cd Backup
Save the partition table of your hard drive to a text file, assuming your hard drive is /dev/sda:
fdisk -l -u /dev/sda > hdptbl01.txt
Backing up with partclone
partclone is a new Linux tool for backing up and restoring hard disk partitions. The following command illustrates a situation where I back up the second partition, compress it on the fly and save the backup in 695M chunks.
partclone.ntfs -c -s /dev/sda2 | bzip2 -c | (cd /mnt/sdb1/Backup; split -d -b 695M - Backup-$(date +%F).partclone.bz2.)
Alternatively, you can use lzma to compress the backup.
partclone.ntfs -c -s /dev/sda2 | lzma -9c > Backup-$(date +%F).partclone.lzma
For quick backup, use lzop:
partclone.ntfs -c -s /dev/sda2 | lzop -c > backup-$(date +%F).partclone.lzo
Restoring Backups with Partclone
Here's a sample command:
cat Backup-2012-05-27.partclone.bz2.* | bzip2 -dc - | partclone.ntfs -r -o /dev/sda2
Backing up with Partimage
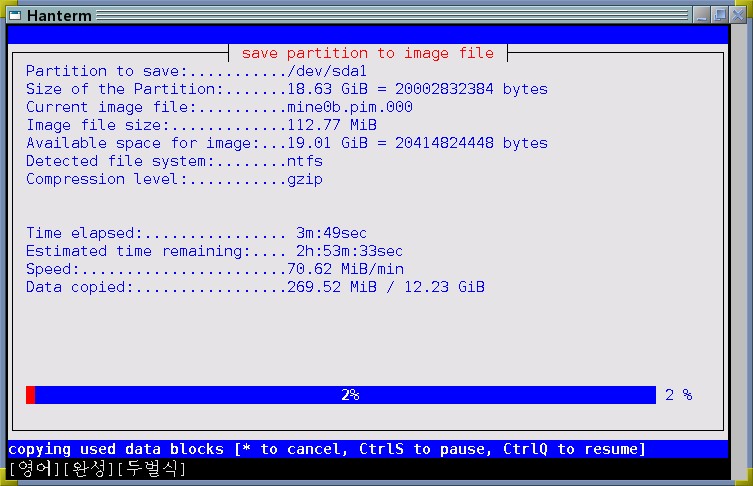
Assuming the partition to back up is /dev/sda1, the following command will back up /dev/sda1 in chunks of 695 MB so you can burn each piece on CD conveniently.
partimage -V 695 save /dev/sda1 backup01.pim
You'll be shown a number of options as seen below so you can tweak some settings. For example, if you want your computer to automatically power off after partimage finishes backup, check the Halt option. Press F5 to continue.

Next, you will be given an option to enter description of the backup.

If the partition you're backing up is an NTFS partition (as most Windows partitions are), you'll be given the warning "The current NTFS support is experimental !". You can safely ignore it for now.

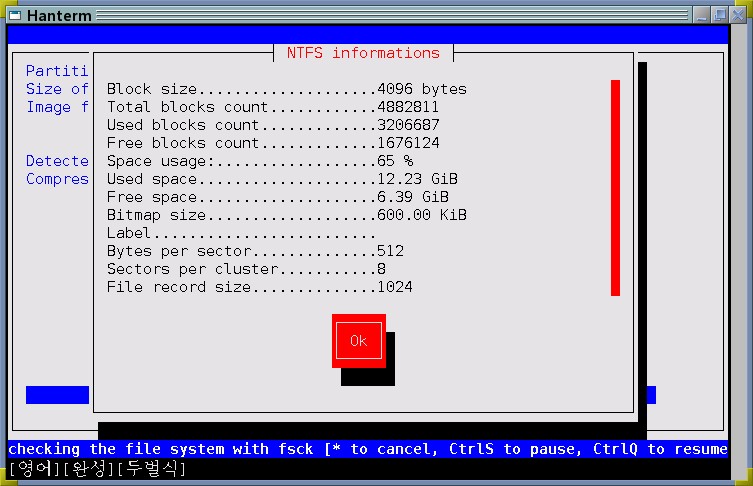
Next, you'll be shown NTFS information about the backup partition.
After that, partimage will start backing up as per instruction. A handful progress window will appear with the time remaining and progress in percentage.
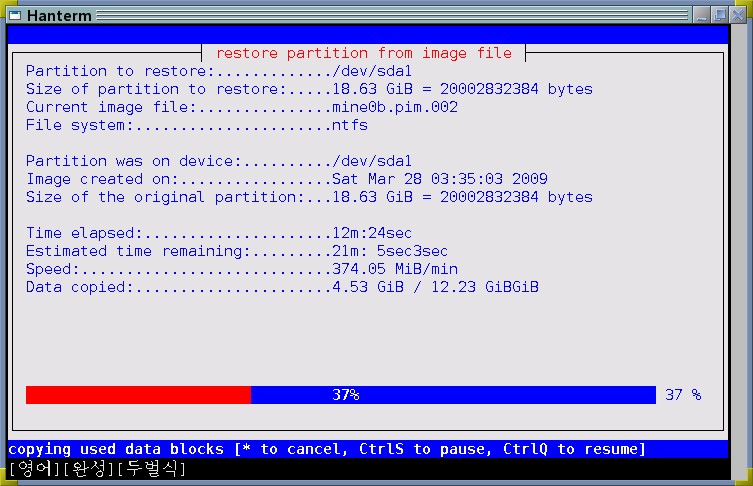
Restoring Partitions with Partimage
When something goes wrong with your computer, you can restore your hard disk partitions with the backup you've made with Partimage. First, make sure that you have a partition whose size is exactly the same as the partition the backup is made from. You can compare the current partition table with the contents of hdptbl01.txt file we've made earlier.
To restore the partition /dev/sda1 from a series of backup files starting with backup01.pim.000, open a console and type the following command:
partimage restore /dev/sda1 backup01.pim.000
Checking the Integrity of Partimage Backups
If you want to check partimage backups for integrity, specify the simulate option either on the command line or in the dialog, for example:
partimage --simulate restore /dev/sda1 backup01.pim.000


No comments:
Post a Comment