Sunday, May 31, 2009

Manually Starting a VNC Server

Manually starting a VNC server is necessary for testing VNC. Once you got VNC to work correctly, you can copy the command line to a script or inetd.conf. First, I created an executable script ~/.vnc/xstartup with the following contents:


#!/bin/sh

exec /etc/X11/Xsession

This file has to be made executable, of course. Prior to starting vnc4server, make sure your X session can start normally by checking your ~/.xsession file. My .xsession file looks like this:


#!/bin/sh

exec openbox

Then, I started vnc4server:


vnc4server -geometry 800x600 -depth 16 -name VNC4

The first time you run vnc4server, it will ask you for the password. Create a password that only you can guess and memorize it. Next, I installed TightVNC U3 package on my Sandisk U3 flash. I went over to another PC running Windows and plugged in my USB flash. The U3 menu popped up and I clicked on the TightVNC icon. Then, I specified the address of my Linux box running vnc4server:


192.168.1.234:1 or

192.168.1.234::5901

After I was done with vnc session, I killed the vnc4server with the following command:


vnc4server -kill :1

When vnc sessions don't seem working, check the log file: ~/.vnc/*.log


Related Posts


Connecting to a VNC Server through a SSH Tunnel

For security and privacy, VNC connection should be done through a SSH tunnel. Here, I am using Putty to set up a SSH Tunnel. First, type in the host name:


Putty_Setup_1003

Next, type in the user name:


Putty_Setup_1010

Check the following options. Also, move Blowfish up for speed:


Putty_Setup_1018

Set up a SSH tunnel. The Source port will be the local port through which the VNC viewer will connect. The destination port is the remote port whereby the VNC server listens. Click Add button:


Putty_Setup_1027

Save the Putty session.


Putty_Setup_1034

Now that you set up a SSH tunnel, you can use a VNC viewer like TightVNC to connect through the SSH tunnel to the remote VNC server. For example, specify localhost::5900 as the server host to TightVNC.


Related Posts


Saturday, May 30, 2009

Building Seamonkey in Linux

Seamonkey is yet another Web Browser with built-in email reader and address book. Formerly known as Mozilla Suite, Seamonkey is now abandoned by the Mozilla foundation in favor of Firefox and Thunderbird. However, Seamonkey is still being developed by a few people and is in a stable, useful state. Seamonkey is sometimes omitted from Linux distributions. If you want to use Seamonkey in such distros, you can either download a pre-compiled package or compile Seamonkey for yourself. Building Seamonkey in Linux is not as complicated as it may seem.


First, you need to install the necessary compiler tools and libraries:


  • g++
  • libgtk2.0-dev
  • libidl-dev
  • libjpeg62-dev
  • libpng12-dev
  • libxft-dev
  • libxt-dev
  • make
  • zip


Next, download and unpack the seamonkey source from here. In the top-level mozilla directory, create a file, named .mozconfig, with the following contents:


mk_add_options MOZ_CO_PROJECT=suite
mk_add_options MOZ_OBJDIR=@TOPSRCDIR@/obj-i586-pc-linux-gnu
ac_add_options --host=i586-pc-linux-gnu
ac_add_options --prefix=/usr
ac_add_options --enable-application=suite
ac_add_options --enable-default-toolkit=gtk2
ac_add_options --enable-xft
ac_add_options --enable-extensions=default,-irc
ac_add_options --with-system-jpeg
ac_add_options --with-system-zlib
ac_add_options --with-system-png
ac_add_options --disable-system-cairo
ac_add_options --enable-crypto
ac_add_options --enable-optimize=-O2
ac_add_options --enable-strip
ac_add_options --enable-safe-browsing
ac_add_options --enable-url-classifier
ac_add_options --disable-gnomevfs
ac_add_options --disable-gnomeui
ac_add_options --disable-installer
ac_add_options --disable-updater
ac_add_options --disable-tests
ac_add_options --disable-debug


Then, start the compilation:


make -f client.mk build

Once compilation finishes, make a tarball of the compiled binaries:


make -C objdir/xpinstall/packager

mv objdir/dists/seamonkey*.tar.gz $HOME

Finally, install Seamonkey:


make -f client.mk install

ln -s /usr/lib/seamonkey/seamonkey /usr/bin/seamonkey

Friday, May 22, 2009

Remote Desktop Session with VNC4Server & TightVNC

We are in a computing era in which we run applications from a remote computer or server. There are many ways for us to have remote desktop sessions. RDP, NX and VNC all are protocols designed to implement remote desktops. Of those, VNC is the most used and supported. This post is about many ways of setting up and using VNC in Linux and Windows. Below I explain how I set up a VNC remote session between my Linux box and a TightVNC viewer running on a Windows PC.


Setting up Inetd to start VNC on Incoming Connections


First, I installed vnc4server on my Debian Linux box. Alternatively, I could install tightvncserver instead. TightVNC is lighter than vnc4server. Anyway, to have inetd automatically start a VNC server on incoming connections, I added the following line to my /etc/inetd.conf file. This is all one line:


5995 stream tcp,rcvbuf=64k,sndbuf=256k wait nobody:nogroup /usr/bin/Xvnc Xvnc -inetd -query localhost -once -geometry 960x600 -depth 16 -AlwaysShared -rfbauth /etc/vnc/passwd -desktop myOffice -dpi 96 -fp /usr/share/fonts/X11/Type1 -co /etc/X11/rgb

For tightvncserver, the inetd.conf line would look slightly different because tightvncserver panics when wait is used instead of nowait. This means that tightvncserver sessions can never be shared when started from inetd:


5960 stream tcp,rcvbuf=64k,sndbuf=256k nowait nobody:nogroup /usr/bin/Xvnc Xvnc -inetd -query localhost -once -geometry 960x600 -depth 16 -desktop myOffice -dpi 96 -fp /usr/share/fonts/X11/Type1 -co /etc/X11/rgb

Typical port values are in the range from 5900 to 5999. Make sure everything in the following checklist is OK for VNC to work:


  • A display manager, such as gdm, kdm, xdm or wdm, must be running and set up to accept XDMCP requests. Read the sections below about setting up XDMCP for VNC sessions.
  • A VNC password must be created and stored in the readable file /etc/vnc/passwd. To create it, run:

    vncpasswd

    mkdir /etc/vnc

    mv ~/.vnc/passwd /etc/vnc

    chmod 644 /etc/vnc/passwd

  • At least, fixed and cursor fonts must be present in the default font paths. If not, specify the font paths with -fp parameter.

Tell inetd to reload settings in /etc/inetd.conf with the following command:


kill -1 $(pidof inetd)


Setting up GDM to handle VNC logins


It is rather simple to make GDM accept XDMCP requests from a VNC server. Open the file /etc/gdm/gdm.conf and add the following lines in the [XDMCP] section:


[xdmcp]

Enable=true

Port=177

DisplaysPerHost=8

The lines above enable GDM to accept logins at UDP port 177. Also, GDM is set up to accept up to 8 users from localhost. Otherwise, GDM may refuse remote logins through SSH tunnel when there are already a couple of users logged in at localhost.


For security, it is recommended to add the following line to /etc/hosts.deny:


gdm: ALL

Then, add the following line to /etc/hosts.allow:


gdm: 127.0.0.1


Setting up XDM for use with VNC


XDM is lighter than gdm or kdm, so XDM is ideal for VNC sessions where network bandwidth and CPU resource are precious. In fact, XDM can coexist with gdm or kdm. In Debian, set HEED_DEFAULT_DISPLAY_MANAGER to false in the script /etc/init.d/xdm:


[ -z "$HEED_DEFAULT_DISPLAY_MANAGER" ] && HEED_DEFAULT_DISPLAY_MANAGER=false

To set up XDM to handle VNC logins and deliver a user's desktop, XDMCP support has to be enabled first. Open the file /etc/X11/xdm/xdm-config and locate the following line:


DisplayManager.requestPort: 0

Change the number 0 to 177. Then, open the file /etc/X11/xdm/Xaccess and specify the range of addresses to allow access to XDM. Usually, it is sufficient to add only the following lines to /etc/X11/xdm/Xaccess:


localhost

127.0.0.1

Optionally, you can change the look of the login screen. Open the file /etc/X11/xdm/Xsetup and enter a command to set the background image:


#!/bin/sh

hsetroot -fill /usr/local/share/pixmaps/Repressed.jpg

You can also change the welcome line and the face image by editing the file /etc/X11/xdm/Xresources:


xlogin*greeting: Remote VNC Session

xlogin*logoFileName: /usr/share/X11/xdm/pixmaps/xorg.xpm


VNC_XDM_2

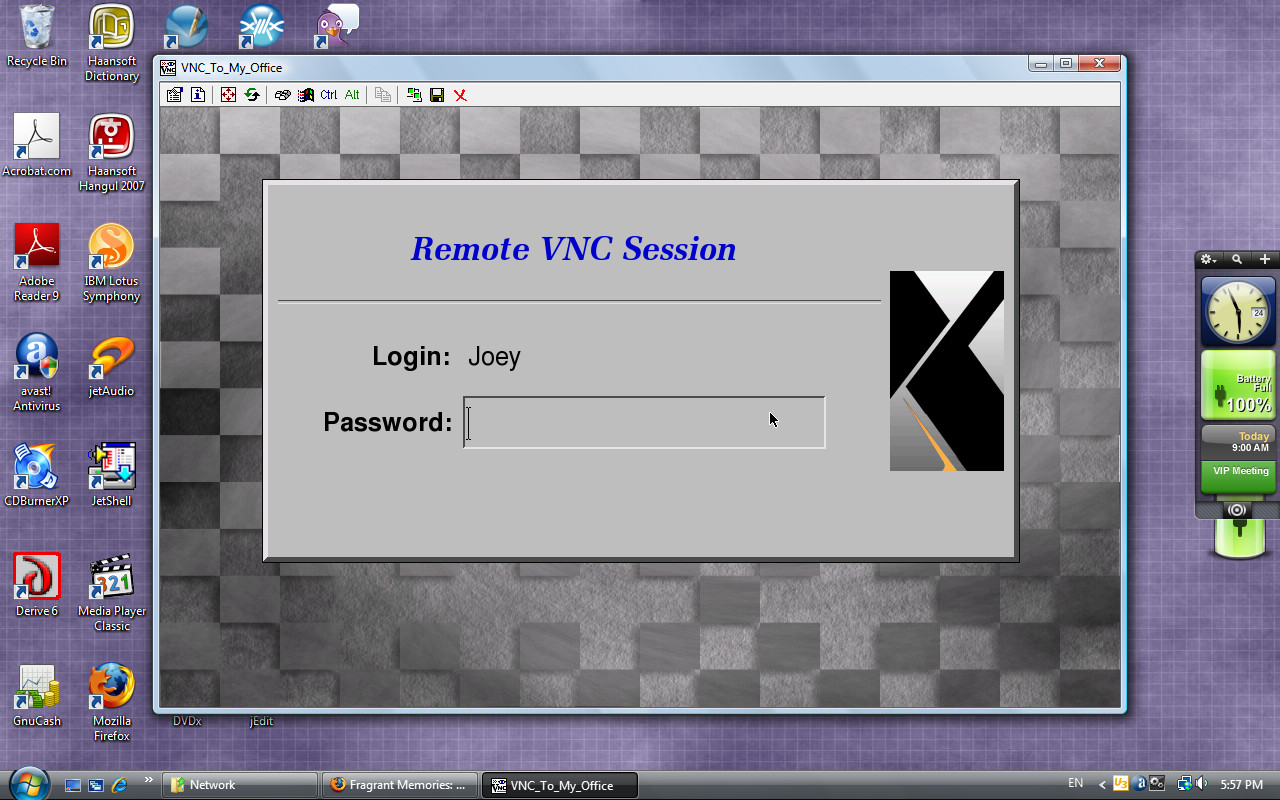
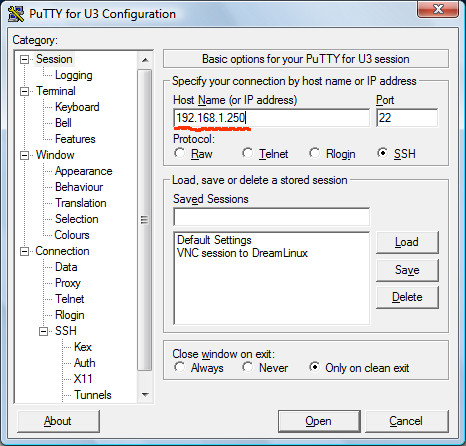
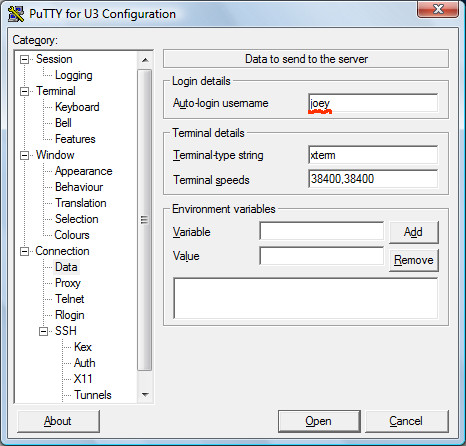
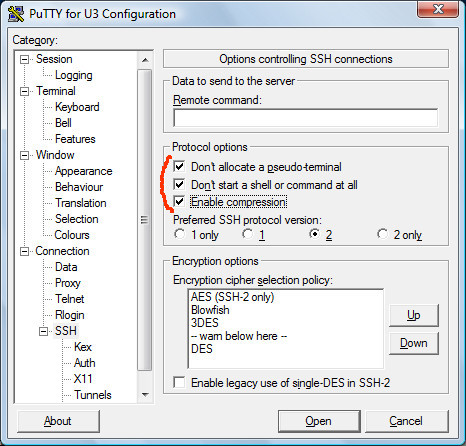
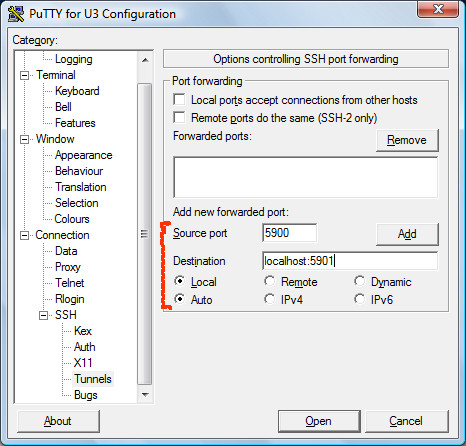
Using TightVNC in Windows to Run a Linux Destop


I installed TightVNC U3 package on my USB thumbdrive so I can connect to my VNC server anywhere. However, I had to tweak TightVNC a little bit to open a VNC session to my Linux desktop.


TightVNC_options

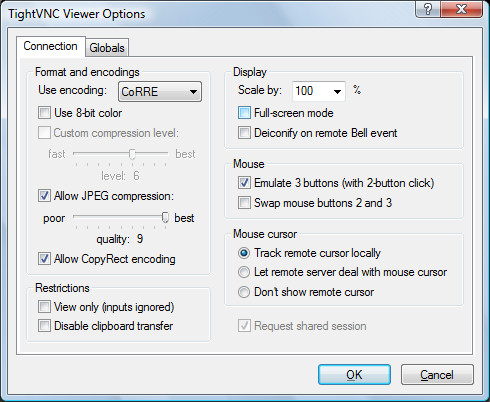
The default encoding Tight doesn't work well with vnc4server. So I had to change it to CoRRE.


Related Posts


Wednesday, May 20, 2009

OpenOffice.org on Portable USB drive

My favorite Office suite is OpenOffice.org which is free and fully functional alternative to Microsoft Office 2007. If you haven't tried it yet, I highly recommend OpenOffice.org to you.


OpenOffice.org Portable 3.0.0 zh-CN by Sunny.x on Flickr

My 2GB MEMOREX USB by b3kool on FlickrHowever, OpenOffice.org is not widely available on computers in offices, cafe, schools and airports. In case you want to use OpenOffice.org on public computers without OpenOffice.org installed, you can install OpenOffice.org onto your USB flash drive beforehand, carry it with you wherever you go, and run OpenOffice.org from the USB thumbdrive. OpenOffice.org can be installed on USB thumbdrives of minimum 512 MB space. There are 2 portable releases of OpenOffice.org:


Math Improper Activity

Wednesday, May 6, 2009

Alexander and Baldwin Museum: Sugar Industry of Hawaii

The museum showcases many exhibits that illustrate the history of the sugar industry of Hawaii and the sugar industry’s impact on the Hawaiian culture. The sugar industry was a major industry in Hawaii since 1835 until 1960’s. It contributed greatly to economic development in Hawaii, laying out important infrastructures, such as water supplies, transportation and local financial groups like various factor agencies. The sugar industry also introduced various ethnic immigrants into Hawaii, making Hawaii such an ethnically diverse society today. The many ethnic groups from China, Japan, Philippines and Portuguese islands also brought their own unique culture with them, and these separate cultures intermingled to become a unique Hawaiian culture today.

The exhibits include the miniature model of the Maui island, the pictures of water tunnel construction, the drawing of Henry Baldwin’s courageous anecdote in Maliko gulch, artifacts of immigrant laborers, aerial picture of plantation camps, and various tools and machines used in the sugar mills.

The museum visit was a memorable experience for me whereby I saw the astonishing accomplishments by Samuel T. Alexander and Henry P. Baldwin, two local entrepreneurs of Hawaiian missionary ancestry. They started one of the largest industries in Hawaii, and their legacy remains one of the most powerful companies in Hawaii, the Hawaiian Commercial and Sugar company. Although the museum is owned and run by the HC&S company, I didn’t find its exhibits biased or partial. For example, the exhibit on the lives of immigrant laborers in plantation camps explained the dual purpose of the camps: to ease the transition to the new land by ethnic groups and to discourage cooperation among ethnic groups. The museum exhibits were very interesting in that they also included many artifacts of labor immigrants and their labor contracts. The exhibits reminded me of the lectures in my Hawaiian history class about the sugar industry and multi-ethnic labor immigrants. The museum was both educational and inspirational to me in that it showed me the past hardships and efforts that led to the current greatness.

Bailey House Museum Report

The Bailey House Museum stands on the royal Hawaiian ground which was deemed sacred for Ali`i of Maui. The fact that Hawaiian noble chiefs donated this sacred ground to the missionaries to build a mission school adds to the significance of this museum. The building that houses the museum was built on 1833 and functioned as a mission school in its early years. Known as the Wailuku Female Seminary, the school taught many daughters of Maui’s chiefs how to read and write the Hawaiian language, the Christianity and crafts, such as spinning and weaving. Here, two important missionaries in the Hawaiian history, Reverend Jonathan Smith Green and Edward Bailey, lived and taught Hawaiian women. By teaching them how to read and write the Hawaiian language, they contributed greatly to perpetuation of the Hawaiian language and preservation of the Hawaiian culture. By educating Hawaiian women, this mission school significantly improved the social status of Hawaiian women, traditionally treated inferior to Hawaiian men.

The building of the Bailey house is in itself an important exhibit,whose structure showcases the workmanship of both the missionaries and early Hawaiian builders. The middle section of the house was built with large white bricks that illustrate the building style of Hawaiians.

Other important exhibits include many drawings by Bailey, his epic poem Hawaii Nei, many Hawaiian artifacts, such as Koa plates, Kapa cloths, stone tools and fishing lure for catching an Octopus, among many other things.

It was a special experience for me to visit the home of early missionaries and Hawaiian women educated there. I saw and touched old furnitures, beds, a spinning wheel, the oven and other housewares that early missionaries used. During the visit, I gained my understanding of what missionary lives in Hawaii were like. It is marvelous that the house still stands after nearly 2 hundred years. The exhibits well illustrate many aspects of Hawaiian history, including the missionary life and the Hawaiian culture. The exhibits are overall satisfactory, considering the limited space and the surrounding atmosphere. I learned about the Wailuku Female Seminary in my Hawaiian history class which I think played a significant role in improving literacy among Hawaiian women and their social status. The museum is an important heritage to Maui, the island I live in.

Berthold Caslon Book: My Favorite Serif

Recently, I tried Berthold Caslon Book. I was struck by its visual appeal and high legibility. Researching this family of Caslon typefaces, I learned that the Caslon typefaces have old history and good reputation.


Adobe Caslon Sample

Related:


Tuesday, May 5, 2009

Problem with saving OpenOffice.org documents as PDF

I use OpenOffice 2.4 in Debian Linux 5.0 Lenny, but recently had a problem with exporting OpenOffice.org documents to PDF. Debian Lenny doesn't have OpenOffice.org 3.0 packages yet. I think the problem originates from using obscure Postscript fonts. I used Caslon Book BE in my OpenOffice.org Writer document, but the output of the exported PDF file was unreadable. Actually, the problematic PDF file didn't display any spaces.


illegible02

Eventually, I fixed this problem. I saved the document as a postscript printout and converted it to PDF using pstopdf13.


ps2pdf13 input.ps output.pdf

ooo24ps

Another thing I did to fix the problem was to change Times New Roman fonts in my formulas to Times New Roman PS. I also had to convert all pictures in the document to encapsulated Postscript format and embed them in the document. For EPS conversion of the pictures, I used GIMP.


legible01

Sunday, May 3, 2009

오픈오피스 한글판

오픈오피스는 강력한 사무용 소프트웨어다. 최신 버전 3.0은 Microsoft 오피스 2007로 작성한 문서를 읽을 수 있지만 Microsoft 오피스 2007 포맷으로 저장할 수는 없다. 한글 윈도 ME에 오픈오피스 3.0을 설치하려 했는데 에러가 발생해 못했다. 그래서 대신 오픈오피스 2.4를 오픈오피스 한국어 커뮤니티에서 받아 설치했다.


OpenOfficeFormula

cdrkit: Ripping CD/DVD ISO in Linux

To copy or rip an ISO image from a CD or a DVD, type the following command in xterm, mlterm or your favorite terminal:


readom dev=/dev/hdc f=mycopy.iso speed=2 retries=8 -noerror -nocorr


The readom command is contained in the wodim package which is commonly found in Debian Linux or Ubuntu systems. The example above rips a CD in the CD-ROM device /dev/hdc and save it as mycopy.iso. To find the device name of your CD-ROM or DVD drive, run wodim --devices.


The f= option specifies the filename to save the ISO image as. I chose the reading speed 2 because the ripping performs better at lower speeds. I also set the retry limit to 8 because the default retries of 128 is too time-consuming in case reading errors occur. For more information on the readom command, refer to the readom manual by running man readom

Windows 98/ME Driver for NEC/Belkin USB 2.0 Controller

I recently installed Windows ME and noticed that Windows ME didn't include drivers for USB 2.0 controllers. I have a Belkin USB 2.0 enhanced controller. It took me a while to find a Windows 98/ME driver for my USB 2.0 card. After searching Yahoo! I found 2 drivers. The first one is the Orangeware driver (Download it HERE) and has the following contents:


OUSB2.INF
OUSB2HUB.SYS
OUSBEHCI.SYS


The other driver (Download NECUSB2.ZIP or HERE) contains the following files:


NEHCD.SYS
NUSBD.SYS
Nehcd.inf
ReadMe.doc

Saturday, May 2, 2009

Taking Screenshots in Linux

It's nice to be able to take pictures of your computer screen. Then, you can show the pictures to your friends or put it on the Web so people can be impressed with your pictures.


In Microsoft Windows, taking pictures of the computer screen is as easy as pressing the Print or Alt+Print key. Pressing the Print key takes a screenshot of the whole screen, whereas pressing the Alt+Print grabs the current focused Windows only.


However, taking screeenshots in Linux is not as simple as in Windows unless you use GNOME or KDE. In this post, I will list many ways of taking screenshots in Linux.


xwd, xwdtopnm and pnmtojpeg combination


In the most primitive way, I use a combination of xwd, xwdtopnm and pnmtojpeg. This method requires you to type commands in xterm. The following example takes the screenshot of the root window — the whole desktop:


xwd -root -screen | xwdtopnm | pnmtojpeg --quality=85 --optimize > ~/screenshot-`date +%F_%T`.jpeg

In case you want to take only the picture of the focused windows, the following example shows how:


xwd -frame -screen | xwdtopnm | pnmtojpeg --quality=85 --optimize > ~/screenshot-`date +%F_%T`.jpeg

It's useful to append a sleep command so that you have the time to select the window or arrange the screen the way you want:


sleep 5 && xwd -frame -screen | xwdtopnm | pnmtojpeg --quality=85 --optimize > ~/screenshot-`date +%F_%T`.jpeg

Friday, May 1, 2009

쓸만한 윈도 프로그램 리스트


제가 추천하는 윈도용 프로그램 리스트입니다. 빠진 게 있으면 댓글 남겨 주세요:


Related Posts


About This Blog

KBlog logo This blog seeks to provide a collection of interesting pictures found on the Web. Thanks for visiting the blog and posting your comments.

© Contents by KBlog

© Blogger template by Emporium Digital 2008

Followers

Total Pageviews

Powered By Blogger