Well, it's ironic that we need to use a Linux program to resize a Windows partition, but we don't want to spend money on buggy Windows programs. There are many tutorials on the Web that show you how to use the venerable GParted program. But in this tutorial, I'll talk about ntfsresize. Be warned that improperly following this tutorial may result in your computer totally unusable. Before proceeding, be sure to back up your computer. Once you've done that, place a Linux CD into your CD-ROM and reboot. I recommend you to try one of the following:
GParted vs ntfsresize
The problem with the user-friendly GParted is that after using it, your Vista is unbootable and you need to get the Vista installation DVD to fix it. In most cases, people don't have Windows installation DVD's because they bought PC's preinstalled with Vista. In such a case, ntfsresize is a better alternative although ntfsresize is not as intuitive as GParted. If you use ntfsresize properly, you can just reboot your PC, let Windows self-check the filesystem, and your Vista is fine after the second reboot. Anyway, both GParted and ntfsresize can wreck havoc to your PC if used improperly.
Windows Boot Manager
Windows failed to start. A recent hardware or software change might be the cause. To fix the problem:
1. Install your Windows installation disk and reboot.
2. Choose your language settings, click Next
3. Choose "Repair your computer"

If you do not have this disc, contact your system administrator or computer manufacturer for assistance.
File: \Windows\system32\winload.exe
Status: 0xc0000225
Info: The selected entry could not be loaded because the application is missing or corrupted
The error above commonly appears when you manipulate you partitions with GParted. To fix the error, read this post: Fixing a Vista Boot Problem.
Why you can't just reboot after using GParted
Every NTFS has a unique serial number (UUID) associated with it. When you resize or move an NTFS filesystem, it is possible that the UUID of the NTFS partition changes. To fix a problem caused by the UUID change, you have to correct the UUID in C:\Boot\BCD.
Displaying the Partition Table
Once you're in Linux, open a console or xterm and type the following command to display the partition table. You may have to replace /dev/sda with /dev/hda or /dev/hdc depending on your hardware configuraton. In general, IDE/ATA hard drives have /dev/hd* names and SATA hard drives have /dev/sd* names.
fdisk -l -u /dev/sda
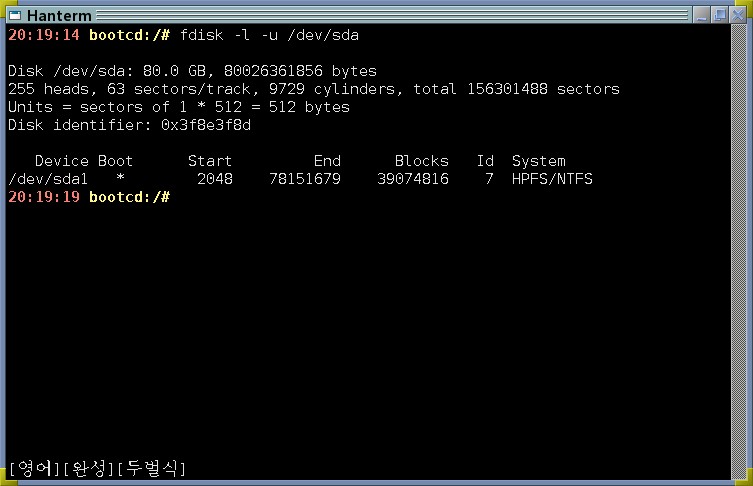
The fdisk -l command shows you which partition has the Windows. In this example, Windows is in the partition /dev/sda1 which starts at sector 2,048 and ends at sector 78,151,679. Since 1 sector is 512 bytes, /dev/sda1 is 39,074,816 kilobytes (about 40 GB).
Shrinking a Windows Partition
Roughly speaking, to shrink a Windows partition, first use ntfsresize to resize the Windows filesystem, then use fdisk to delete the Windows partition and create a new one that fits the smaller NTFS. Type the following command to find out how small you can resize your partition to:
ntfsresize --info /dev/sda1
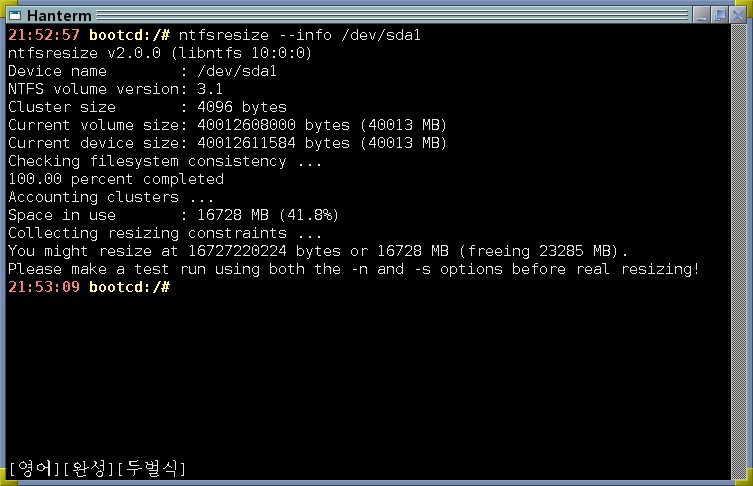
The output above says that the NTFS partition can be resized as small as 16,728 MB. For example, to resize from 40GB to 20GB, type the following command.
ntfsresize --size 20G /dev/sda1
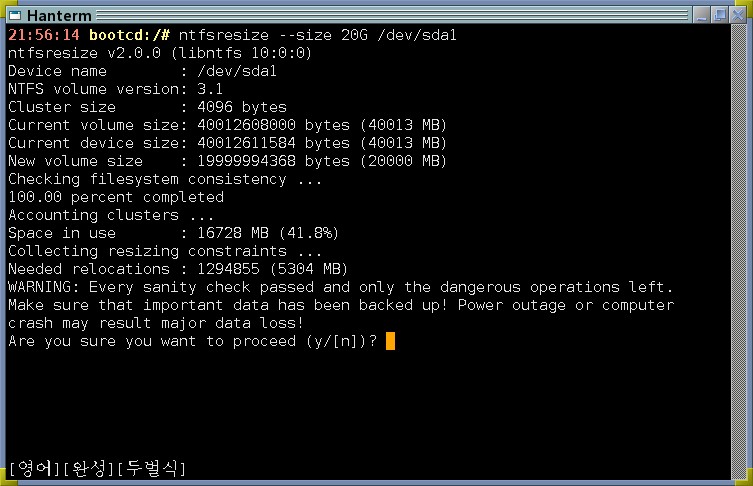
A question appears asking your confirmation to proceed. If you type y, ntfsresize will resize your Windows filesystem showing the progress. When ntfsresize finishes resizing the NTFS, the screen looks like this.
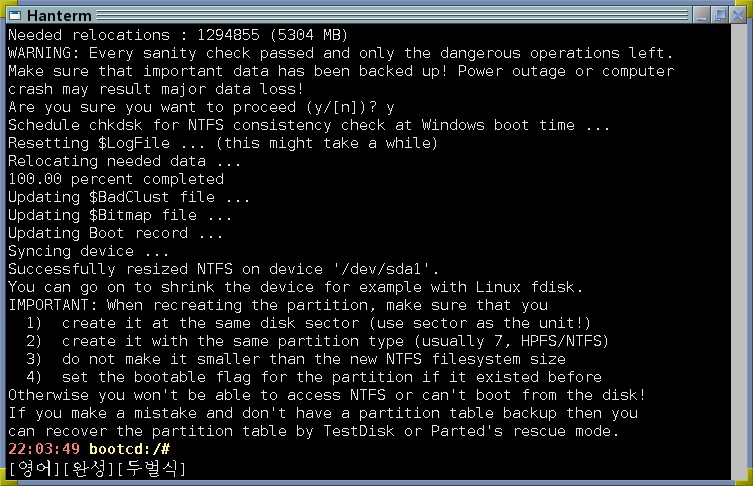
Type fdisk -u /dev/sda to change your partition table to accommodate the resized Windows filesystem.
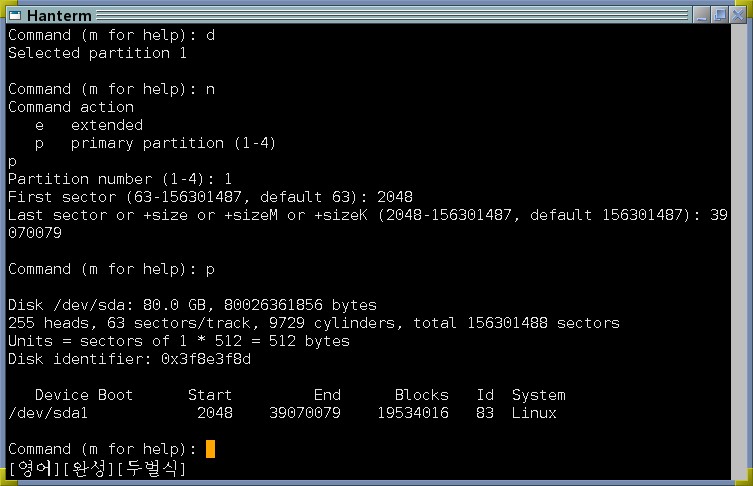
First, delete the existing Windows partition by typing d and then the partition number 1. Now type n to create a new partition, then type p to set it primary, then type 1 to make it the first partition. When you are asked for the starting sector, type the same starting sector as the old deleted partition, in this case 2048. When you're asked for the ending sector, give the approriate number that's slightly larger than the filesystem. Here are my calculations:
20,000,000,000/512=39,062,500
39,062,500/255/63=2,431.528
2,432*255*63=39,070,080
39,070,080-1=39,070,079
Since I resized my Windows partition to 20GB, my new Windows filesystem is 39,062,500 sectors and 2,431.53 cylinders — my hard disk is 255 heads * 63 sectors/track * 9729 cylinders. Round the number up to 2,432 cylinders and convert it to 39,070,080 sectors. Finally, subtract 1 from it and I got 39,070,079. Give it as the ending sector.
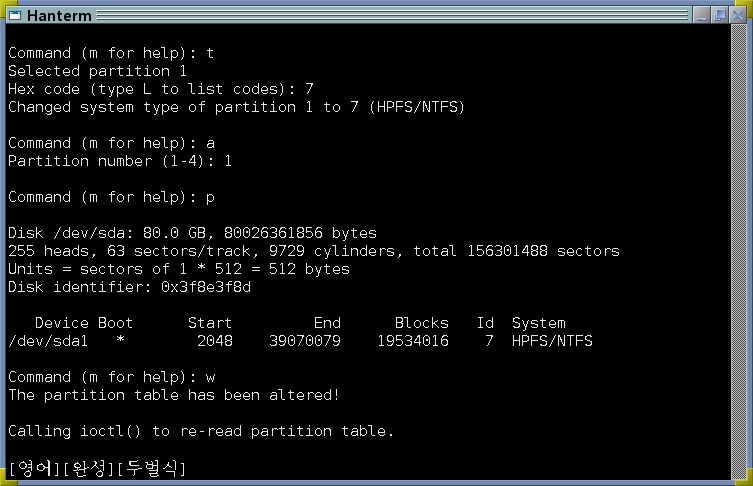
Type t, 1, 7 to change the type of the new first partition as NTFS. Type a to make it active. Type p to display the changed partition table to make sure it's correct. Finally, type w to write the new partition table and exit fdisk.
Now, all that's left to do is reboot and see if everything works. Hopefully, you'll see a black-and-white screen for checking filesystem integrity. After that and another reboot, you'll get back to Windows. Hooray!
Enlarging a Windows Partition
Enlarging a Windows partition takes the opposite steps. First delete the Windows partition and create a larger partition beginning at the same sector as the deleted partition. Then use ntfsresize to enlarge the NTFS.


No comments:
Post a Comment