I found it hard to set up file transfer between Windows XP and Windows Vista using direct Ethernet connection. Sometimes, Windows Vista can see a Windows XP machine, but Windows XP somehow can't see a Windows Vista machine. I connected a PC running Windows XP and a PC running Windows Vista with a Ethernet crossover cable.
Setting Up Windows XP for direct Ethernet connection
- Make sure that the following items are enabled in the Local Area Connection Properties dialog.
- Client for Microsoft Networks
- File and Printer Sharing for Microsoft Networks
- Internet Protocol (TCP/IP)
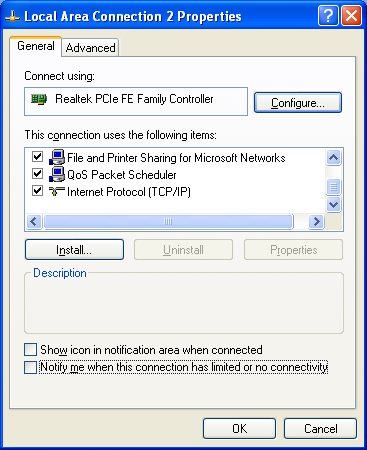
You can open the Local Area Connection Properties dialog by opening Control Panel, Choosing Network and Internet Connections category, clicking Network Connections icon, right-clicking the icon for your Ethernet connection and choosing Properties from the right-click menu.
- Client for Microsoft Networks
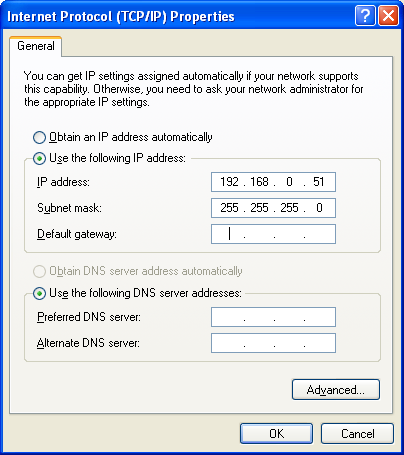
- Select Internet Protocol (TCP/IP) and click Properties. Internet Protocol (TCP/IP) Properties dialog will show up. Click Use the following IP address and specify IP address and subnet mask. Then, click OK to close the Internet Protocol Properties dialog.
- Open the Advanced tab and click the Settings button in Windows Firewall area.
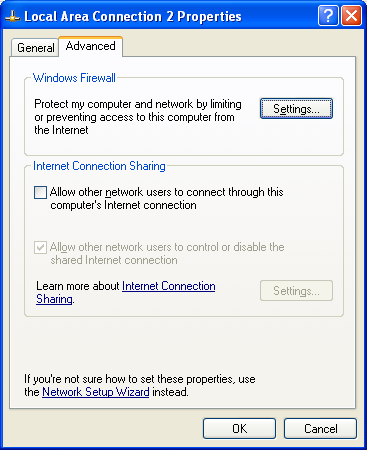
- Windows Firewall window will show up. Open the Exceptions tab and make sure that File and Printer Sharing is enabled. Click OK to close Windows Firewall window. Then, click the Close button in the Local Area Network Properties window.
- Now connect the PC running Windows XP to a PC running Windows Vista with a Ethernet crossover cable.
- In the Network Connections window, click and select the icon for your Ethernet connection. In the left pane of the Network Connections window, click Set up a home or small office network. Keep clicking the Next button until you reach the Select a connection method step. Choose Other. Then choose "This computer belongs to a network that does not have an Internet connection" and click Next.
- Make sure that your Computer name is unique. Click Next.
- Type a Workgroup name that will be shared with a PC running Windows Vista. Click Next.
- Turn on the file and printer sharing. Click Next.
- Review your network settings and click Next.
- Select "Just finish the wizard." Click the Finish button to close the wizard.
Setting Up Windows Vista for direct Ethernet Connection
- Open the Control Panel. Under the Network and Internet category, select View network status and tasks. In the left pane, click Manage network connections. Right-click the icon for your Ethernet connection and choose Properties.
- In the Local Area Connection Properties dialog, make sure the following items are enabled.
- Client for Microsoft Networks
- File and Printer Sharing for Microsoft Networks
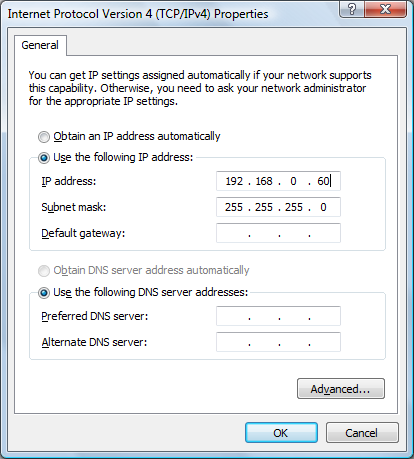
- Internet Protocol Version 4 (TCP/IPv4)
- Link-Layer Topology Discovery Responder
- Link-Layer Topology Discovery Mapper I/O Driver
- Client for Microsoft Networks
- Select Internet Protocol Version 4 (TCP/IPv4) and click Properties. Click Use the following IP address and enter unique values for IP address and Subnet mask.
- Go back to the Network and Sharing Center. Unidentified network will be shown. Click Customize and choose Private.
- In the Sharing and Discovery area, make sure that you have the following settings.
- Network discovery: On
Expand the Network discovery section and verify that the workgroup is the same as with Windows XP. - File Sharing: On
- Public folder sharing: On
Expand this section and enable Turn on sharing so anyone with network access can open, change, and create files - Printer sharing: On or Off
- Password protected sharing: Off
To avoid unnecessary problems, check it off. - Media sharing: On
- Network discovery: On


No comments:
Post a Comment